✍️ 8+ years using All-Clad kitchen appliances daily🔄 Updated April 2026
All-Clad waffle maker, PTFE nonstick cooking plates, removable and non-removable grids, baked-on batter, cooking spray residue, burnt grease, stainless steel exterior, overflow drip tray — every mess this machine creates has a fix. Here’s how to clean all of it without damaging the nonstick coating or getting water near the heating element.
Someone in my house used aerosol cooking spray on the All-Clad waffle iron for six consecutive weeks before I noticed. The plates went from slick to sticky to genuinely difficult — waffles pulling apart at the edges, releasing half on the top plate, half on the bottom. I cleaned it three times to get back to baseline.
The whole situation was avoidable. The spray was the problem. And the fix — once I knew what I was dealing with — wasn’t complicated. What made it hard was not knowing which cleaning approach was safe on PTFE nonstick plates versus which ones would make things worse. That’s the gap this guide closes.
⚡ Quick Answer — How to Clean an All-Clad Waffle Iron
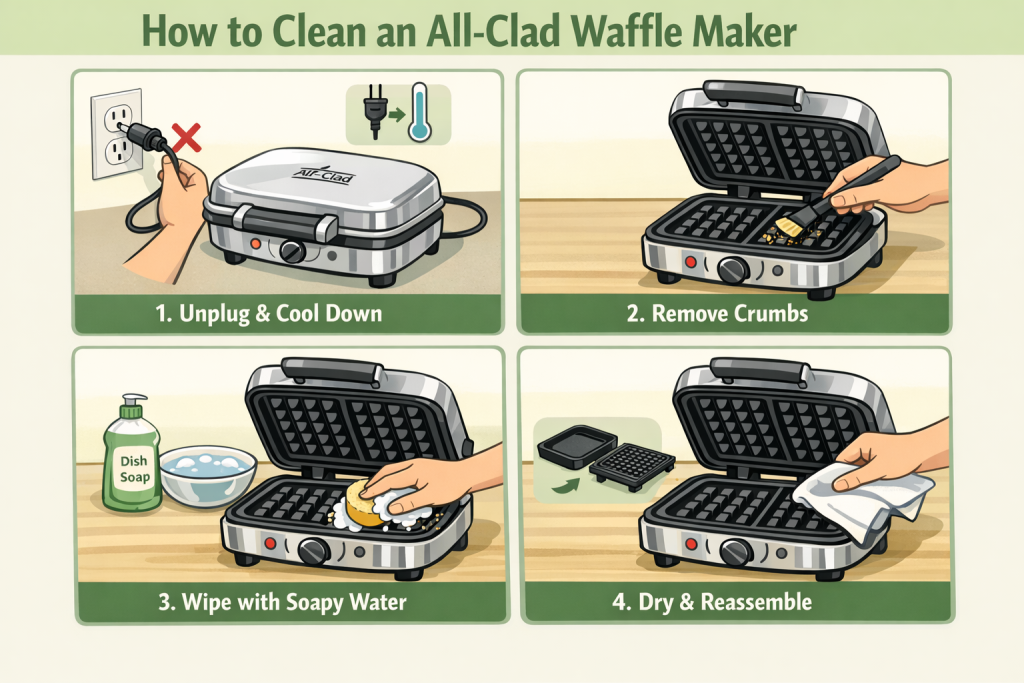
Step-by-Step: After-Every-Use Cleaning Routine
Unplug immediately, cool 5–10 minutes — warm plates clean easier than cold; hot plates are a burn risk
Dry paper towel first — fold to a point, drag through every grid channel; absorbs pooled grease and lifts loose crumbs before anything hardens
Steam method for stuck batter — 2–3 damp (not dripping) paper towels on the bottom plate, close the lid for 5 minutes; steam lifts baked-on batter without water entering the heating element
Soft brush for grooves — pastry brush or old toothbrush reaches every channel the paper towel missed; Q-tips for corners near the hinge
Damp cloth on plates and exterior — wrung-out cloth, small amount of dish soap; dry immediately; never run under the tap
Drip tray: remove, rinse, dry completely — reinsert only when bone dry; a damp tray sitting against the housing creates mold risk in humid kitchens
Removable plates (Gourmet model only) — detach when cool, wash with mild soap and soft sponge or top-rack dishwasher; dry before reattaching
Classic vs. Gourmet: Which All-Clad Model You Have Changes How You Clean It
Most cleaning guides treat all waffle makers the same. They shouldn’t. All-Clad makes two fundamentally different designs, and the cleaning approach for each is genuinely different. Getting this wrong is how people get water into heating elements.
Classic Round/Belgian
Non-removable PTFE nonstick plates — the most common All-Clad waffle iron
The classic round waffler and Belgian model. Plates are permanently fixed to the heating element below them. You cannot submerge these, soak them, or run water over them. Every cleaning happens with cloths, brushes, and the steam method — moisture controlled, targeted, never dripping. This is the harder model to maintain correctly and takes up most of this guide.
Gourmet 4-Slice
Removable PTFE nonstick plates — the newer All-Clad waffle maker with dishwasher-safe plates
The Gourmet Stainless Steel Digital model. Plates clip in and lift out cleanly. They’re dishwasher-safe (top rack) or hand-washable. The base unit still cannot go near water — only the plates detach. It also has an overflow batter tray that catches spills before they reach the housing. Significantly easier to maintain than the Classic.
Open the waffle maker. Try gently lifting a plate at the corner. If it releases with a click — removable, Gourmet model. If it’s flush with the housing and won’t budge — non-removable, Classic model. Model number is stamped on the bottom. All-Clad’s PDF manuals are on their website if you’ve lost the original.
What Actually Makes an All-Clad Waffle Maker Dirty — Four Distinct Problems
Not all waffle maker mess is the same. There are four types of buildup and each responds to different cleaning. Using the wrong method — steam on cooking spray residue, or baking soda paste on fresh batter — wastes time and sometimes makes things worse.
Happens every time you cook. Batter presses into the grid channels and bakes there. While the iron is warm, this residue is soft and comes off with a paper towel in thirty seconds. Let it cool completely and harden overnight — it’s a different job. This is the mess that’s completely controlled by habit, not products.
Cooking Spray Polymerization — The Worst Problem
Aerosol sprays (Pam, Baker’s Joy, generic store brands) don’t just contain oil. They contain propellants, emulsifiers, and lecithin. These additives polymerize under cooking heat — they cross-link into a sticky, brown, semi-permanent layer that bonds to the nonstick surface far more aggressively than oil alone. Consumer Reports calls this out specifically. All-Clad’s manual says not to use aerosol spray on the plates. Most people ignore both.
One use doesn’t do visible damage. Six weeks of use creates a tacky brown film that regular wiping won’t touch — and that makes the nonstick surface actively worse at releasing food. I’ve seen this exact progression twice in kitchens I’ve worked in.
Butter and Oil Seeping into Plate Joints
High-butter batters render fat that seeps past the grid channels into the joints where the plate meets the housing. This fat oxidizes with each heating cycle and turns gummy and dark over months. It doesn’t affect cooking immediately but accumulates into a hardened ring around the plate edge that’s difficult to reach without getting moisture into the housing.
The polished stainless housing picks up calcium deposits from cleaning cloths and mineral fog from the steam that escapes while cooking. Cosmetic only. White vinegar on a cloth removes them in thirty seconds. Worth doing monthly — ignored long-term, the mineral film turns matte and dulls the finish.
Mess Type
What Causes It
How Fast It Builds
Best Fix
Fresh batter in channels
Normal cooking overflow
Every use
Dry paper towel while warm — 2 min
Hardened batter
Not cleaning while warm
Hours to days
Steam method + soft brush
Cooking spray buildup
Aerosol propellants polymerizing under heat
2–6 weeks
Baking soda paste + soft toothbrush; stop using spray
Rancid butter residue at plate joints
High-butter batter seeping into housing gaps
Months
Damp cloth + soap; toothpick for crevices
Exterior water spots
Hard water minerals from cleaning and cooking steam
After each cleaning
White vinegar on microfiber cloth
Batter splatter on stainless housing
Overflow hitting the exterior while cooking
Each use
Warm soapy damp cloth; dry immediately
The Right After-Every-Use Cleaning Routine for All-Clad Waffle Irons
I’ll be direct: if you do the dry paper towel wipe while the plates are still warm, you eliminate 80% of the buildup problems people deal with. The whole thing takes two minutes. The problems start when people let it cool completely, put it away, and deal with it “next time.”
Non-negotiable with any water-sensitive electrical appliance. The All-Clad manual says it twice. Wait 5–10 minutes — you want warm plates, not hot ones. Hot plates make cleaning cloths steam and dry too fast. Cold plates make residue hard and adhesive. Warm is the target.
2
Fold a paper towel to a point and drag it through every grid channel
This is the step that matters most. A folded corner reaches into the channels. Dragging it through absorbs pooled butter and lifts loose batter crumbs before they harden. Do both plates — top and bottom. Takes forty-five seconds and prevents half of everything that makes deep cleaning necessary.
3
Pastry brush for the grid corners and edges
A pastry brush or dedicated soft-bristle brush gets into the four corners of each waffle grid — the spots a folded paper towel reaches around but doesn’t clean. Brush the loosened debris toward the center, then wipe it away. Old toothbrush works too, soft-bristle only.
4
Damp cloth — wrung out until it leaves no drips — on the plate surface
Not wet. Damp. Hold the cloth up and squeeze — nothing should drip. Wipe the nonstick plate surface to pick up any remaining residue. A small drop of dish soap is fine here for greasy sessions. The risk to avoid is moisture running into the plate-housing joint and down toward the heating element.
5
Microfiber cloth on the stainless exterior
Warm water, drop of dish soap, wiped along the steel grain. Dry immediately with a clean section of the cloth. Leaving water on polished stainless produces the mineral spots that eventually dull the finish.
Pull it out, dump any collected batter or butter, rinse under warm water if removable. Wipe with a damp cloth if not. Dry completely before sliding back in. Thirty seconds.
7
Leave the lid open until fully dry — then close for storage
Closing a slightly warm, slightly damp waffle maker traps steam inside. Over time in humid kitchens this produces mold in the rubber gasket around the plate edges. Five minutes of open-air cooling after cleaning is free insurance.
Everything above done while the plates are warm takes two minutes. The same cleaning done after the machine has fully cooled and sat overnight takes fifteen — with worse results. The cleaning window is right after the last waffle comes out. That’s when to do it, every time, without exception.
How to Steam-Clean All-Clad Waffle Iron Plates Without Damaging the Nonstick
The steam method is the best technique for non-removable plates. Consumer Reports recommends it. It’s the approach that cleans baked-on batter effectively while keeping water away from the heating element — which is what every other wet cleaning method risks.
The logic is simple: steam is water vapor, not liquid water. It penetrates the grid channels and loosens batter adhesion from below without any moisture pooling on the plate surface or running into the housing joints.
1
Unplug, cool 5–10 minutes — plates should be warm, not hot
Warm plates convert the moisture from the paper towels to steam more effectively. A fully cold machine produces less steam and extends the process.
2
Wet 2–3 paper towels, wring until no drips fall when squeezed
This is the part people get wrong. “Damp” means no dripping — at all. Squeeze the paper towels firmly over the sink before putting them in. Dripping paper towels send liquid water down into the hinge and housing. That’s electrical damage territory.
3
Lay towels flat on the bottom plate, close the lid firmly
The towels should cover the entire plate surface. Close the lid to trap the steam inside. Walk away for 5 minutes — the residual heat does the work. You’ll sometimes hear faint sizzling. Normal.
4
Open carefully — a puff of steam releases from the hinge
Keep hands clear of the hinge area when opening. The paper towels will have turned dark from absorbed batter and grease. Discard them.
5
Wipe the plates with a fresh damp cloth, then soft toothbrush on channels
The batter should wipe off with minimal pressure now. Toothbrush for any remaining bits in the grid corners. Q-tips for the tight area near the hinge where batter accumulates and no cloth reaches.
6
Final dry wipe, leave lid open 10 minutes before closing
Any moisture on or near the heating element needs time to evaporate. Storing immediately after steam cleaning — lid closed — traps that moisture inside. Ten minutes open is enough.
✅ Why Steam Beats Scrubbing for PTFE Nonstick
Mechanical scrubbing on PTFE nonstick — even with a soft sponge — creates micro-scratches that accumulate over dozens of cleaning sessions. Each scratch is a place where batter adhesion is slightly stronger on the next cook. Steam does the work chemically, not mechanically — the batter bond breaks from heat and moisture without any contact pressure. The nonstick lasts longer. Worth the five-minute wait.
How to Remove Stuck-On Batter from All-Clad Waffle Iron Grids
Waffles that stuck and tore — leaving chunks baked into the grid — or batter that was left overnight and hardened completely. The steam method is always the first move. When that’s not enough, baking soda paste with a toothbrush is the right escalation.
What you don’t do: force metal tools into the grids, use scouring pads, or pour water over the plates and scrub. All three damage the PTFE coating permanently. The damage isn’t visible immediately — it shows up over the next ten cooking sessions as progressively worse sticking.
Why Waffles Stick in the First Place
Three causes, in order of frequency. First: the waffle was underdone — pulled out before the steam finished releasing, which means the batter proteins hadn’t set. An underdone waffle tears, a done waffle releases. Second: insufficient fat in the batter recipe — very low-butter or low-oil batters stick more regardless of nonstick condition. Third: cooking spray residue has turned the nonstick surface tacky — the spray that was supposed to help is now the problem.
Baking Soda Paste Method for Stubborn Stuck Batter
1
Try the steam method first — always
Five minutes with damp paper towels solves 70% of stuck batter situations without any product. Only escalate to baking soda if the steam method left visible residue.
2
Mix thick baking soda paste — toothpaste consistency
One tablespoon baking soda, 3–4 drops of water. Stir to a thick paste that holds its shape. Too runny and it drips into the heating element housing — the problem you’re explicitly trying to avoid.
3
Apply with a soft toothbrush directly to the stuck area
The toothbrush head gets into the grid channels precisely. Apply only where there’s visible stuck material. Baking soda paste on nonstick is fine — it’s mild enough — but there’s no reason to expose more surface than necessary.
4
Wait 10–15 minutes, scrub gently with the toothbrush
The alkalinity (pH 8–9) weakens the adhesion between baked batter and the plate surface. Light circular scrubbing with the soft toothbrush. No pressure. The chemistry does the work — mechanical force is just finishing it off.
5
Wipe completely clean — multiple passes with a damp cloth
Baking soda residue left on a nonstick plate bakes into the surface on the next cook. Wipe two or three times until no white powder remains anywhere in the grid channels. Then dry completely before closing.
⚠️ Metal Utensils on Nonstick Grids — One Scratch Is One Too Many
A fork, knife, or metal spatula used to pry a stuck waffle from the grid scratches PTFE coating on contact, every single time. The All-Clad manual specifies nonstick-safe utensils only. Use a silicone spatula, a wooden skewer, or a rubber scraper. Scratched nonstick is permanently damaged — no home re-coating option exists for waffle iron plates on the Classic model.
How to Remove Cooking Spray Residue and Burnt Grease from All-Clad Waffle Maker Plates
This is the cleaning problem most guides don’t fully explain — because most guides also recommend using cooking spray, which is the source of the problem. Let me be clear about what cooking spray does to a nonstick waffle iron over time, and then how to fix it when it’s already happened.
The Science of Why Cooking Spray Damages Nonstick
Aerosol cooking sprays aren’t just oil in a can. They contain propellants (usually propane or butane), lecithin as an emulsifier, and various additives. At cooking temperatures — 375°F and above on a preheated waffle iron — these additives polymerize. They cross-link into a hard, brown, semi-plastic residue that bonds to the PTFE surface below the seasoning layer.
One use: nothing visible. Two weeks of use: a slight tackiness. Six weeks: a brown film in the grid channels that makes the nonstick surface actively stickier than it was before you started using the spray. The propellants did exactly what you were trying to prevent food from doing.
Consumer Reports documents this. All-Clad’s official manual says to condition plates with a small amount of oil applied by pastry brush before first use — not spray, not before every use. After that, a properly maintained plate needs no oiling at all.
Removing Cooking Spray Buildup That’s Already There
1
Plain cooking oil applied by pastry brush — let sit 5 minutes
Counterintuitive but effective for early-stage buildup. A thin coat of neutral oil (canola, vegetable, grapeseed) applied to the tacky area and left for five minutes softens the polymerized spray residue from the surface. This works on fresh-ish buildup — a few weeks of use. For months-old buildup, skip to baking soda.
2
Wipe with paper towel, reassess
If the brown residue comes up with the oil wipe — repeat once and you’re probably done. If the surface still feels tacky and the paper towel shows no brown residue — the buildup is deeper. Move to baking soda paste.
3
Baking soda paste, 20 minutes on the affected area
Same thick paste as for stuck batter — but leave it longer on cooking spray residue. The polymerized layer is harder than baked batter and needs more alkaline contact time. Soft toothbrush application, 20 minutes, then gentle circular scrubbing.
4
For severe buildup: hydrogen peroxide + baking soda paste
Mix baking soda with hydrogen peroxide instead of water — to the same thick paste consistency. Apply to the affected area, let sit 1–2 hours. The oxidizing action of hydrogen peroxide breaks down polymerized residue more aggressively than baking soda + water alone. The Kitchn documents this method. Wipe completely clean after — hydrogen peroxide residue left on nonstick affects subsequent cooking.
5
Multiple damp cloth wipe passes — no residue left on plates
Wipe until a fresh white paper towel comes away completely clean. Then dry. Then switch to a pastry brush with plain oil for future use — never aerosol spray again.
🍳 What to Use Instead of Cooking Spray
A pastry brush and a small amount of neutral oil — applied once before the very first use only. After that: nothing. A well-maintained PTFE nonstick surface doesn’t need oiling between uses. If waffles start sticking, add more fat to the batter recipe (more butter, more oil) rather than spraying the plates. The plate surface is fine. The batter needs adjusting.
How to Clean the Stainless Steel Exterior of an All-Clad Waffle Maker
The stainless housing is what makes this machine look different from a $30 drugstore waffle iron five years in. Or doesn’t, if you clean it with the wrong products. All-Clad’s manual is explicit on this point and it’s worth taking seriously.
Routine Stainless Cleaning After Every Use
Microfiber cloth, warm water, one small drop of dish soap. Wipe along the visible grain of the steel — there’s always a directional brush pattern in polished stainless. Cross-grain wiping leaves visible swirl marks. Wipe away soap residue with a clean damp section of the cloth. Dry immediately. Done in under a minute.
Removing Water Spots and Mineral Deposits from the Stainless Housing
White haze from hard water tap water or mineral fog from cooking steam. White vinegar on a microfiber cloth, held against the deposit for thirty seconds. Wipe away with a clean damp cloth. Dry immediately — don’t let vinegar sit on the stainless long-term, the acidity affects the finish eventually. Monthly is enough frequency unless you live in a hard water area.
Removing Batter Splatter That Baked onto the Housing
Batter that hit the exterior during cooking and baked there becomes brittle when cold. Soak a cloth in warm soapy water and press it against the hardened splatter for two full minutes. The moisture softens it enough to wipe away without scraping. For batter that got into the hinge crease or around the lock catches — toothpick to lift the bulk of it, Q-tip dipped in soapy water for the residue. Dry everything after.
⚠️ From the All-Clad Manual — Verbatim
“Do not use harsh detergents or scouring pads on the exterior of the waffle maker as this may damage the polished finish.” No steel wool, no abrasive pads, no aerosol cleaning sprays. The stainless housing scratches — and unlike the nonstick plates on the Gourmet model, the housing can’t be replaced. Soft cloths only.
How to Clean All-Clad Gourmet Waffle Maker Removable Nonstick Plates
If you have the Gourmet model, cleaning is a fundamentally different experience. The plates come out. The mess goes with them. The base stays dry. This is what makes the Gourmet worth the premium for people who make waffles regularly.
1
Unplug and cool completely before touching the plates
All-Clad is specific: allow to cool before removing parts. The plate edges and housing metal retain heat longer than the surface. Rushing this is how you burn your fingers on the plate latch.
2
Release the latches and lift both plates out cleanly
They should come out with a firm upward lift once unlatched. Don’t force them sideways — the electrical contacts at the back are precise and bending the plate damages them.
3
Dishwasher (top rack) or hand wash — your choice, with caveats
The plates are rated dishwasher-safe. Top rack only, standard cycle. But repeated dishwasher cycles degrade PTFE faster than hand washing — the high-alkaline detergent and heat cycling work on the coating over time. For longevity, hand wash. For convenience, dishwasher is fine occasionally.
4
Hand wash: warm water, mild dish soap, soft non-scratch sponge
Both sides — the grid surface and the back. The back of the plate picks up residue from the heating element contact area. Rinse completely, dry with a cloth, leave on a rack to finish air-drying before reattaching. Reattaching a damp plate risks moisture at the electrical contacts.
5
Wipe the base housing with a damp cloth while plates are out
With the plates removed, the heating element housing interior is accessible. A damp cloth picks up accumulated dripped batter and grease from this area. Dry immediately. Don’t let moisture sit near the electrical contacts where the plates connect.
💡 Gourmet Model Longevity
The removable plate design means you can replace the plates when the nonstick eventually degrades — something impossible on the Classic model where the plates are permanent. This is a real long-term advantage. All-Clad sells replacement plate sets. Treating the plates well with hand washing extends the time before you need them.
How to Clean the All-Clad Waffle Maker Overflow Drip Tray
The most neglected part. Most people clean the plates and forget the drip tray exists. A drip tray with three weeks of accumulated batter and rancid butter is a real hygiene problem — and a source of smoke and bad smell when the machine heats up on the next use.
All-Clad’s manual says to empty the drip tray when the waffle maker is cold, and to use oven mitts if it must be emptied hot. The cold removal is the right default — pulling a hot drip tray out of a waffle maker is genuinely an injury risk if you’re not careful.
1
Slide the tray out when the machine is fully cold
It sits at the back of the unit, below the plate hinge. Pull it straight out — don’t tip it or the accumulated liquid batter spills.
2
Dump accumulated batter and grease, then wash under warm water
Mild dish soap, a sponge or soft brush. For baked-on overflow that’s hardened in the tray — soak in warm soapy water for 10 minutes, then scrub with a non-scratch pad. It’s a separate removable piece; you can fully submerge it.
3
Dry completely — towel then air dry — before reinserting
A wet drip tray sitting against the waffle maker housing in a humid kitchen creates mold conditions in the gap between the tray and the housing. Towel dry, then leave it on the counter for 10 minutes. Bone dry before reinserting.
How often? After every 2–3 uses if you cook with butter-heavy batters. After every 4–5 uses for leaner batters. Any time you see visible batter accumulation or smell anything when the machine heats up — clean it immediately.
All-Clad Waffle Maker Cleaning Methods Compared: What Works, What Doesn’t
Method
Best For
Safe on PTFE Nonstick?
Works on Non-Removable Plates?
Time Required
Dry paper towel wipe (warm plates)
Fresh batter, pooled grease — every use
Yes
Yes — primary daily method
2 min
Steam method (damp towels, lid closed)
Baked-on batter, general deep clean
Yes — zero abrasion
Yes — best option for non-removable
5 min hands-off
Pastry brush / soft toothbrush
Grid grooves, corners, hinge area
Yes — soft bristles only
Yes
3–5 min
Baking soda paste + soft toothbrush
Hardened batter, cooking spray buildup
Yes — mild enough for PTFE
Yes — apply carefully, remove completely
20 min total
Plain cooking oil + paper towel
Early cooking spray residue softening
Yes
Yes
5 min
H₂O₂ + baking soda paste
Severe months-old cooking spray buildup
Yes — rinse thoroughly after
Yes — careful, thick consistency only
1–2 hr sit
Damp cloth + mild dish soap
Plate surface routine clean, stainless exterior
Yes
Yes
2 min
White vinegar on microfiber
Stainless exterior mineral deposits and water spots
Not recommended on plates
Exterior only
1 min
Dishwasher top rack
Removable plates (Gourmet model only)
Yes — degrades faster than hand wash
Base unit never in dishwasher
Dishwasher cycle
Running under tap water
Nothing — never appropriate
Irrelevant — damages appliance
Never — electrical hazard
—
What NOT to Do When Cleaning an All-Clad Waffle Maker — Per the Official Manual
✅ Safe to Do
Unplug before every cleaning session
Damp (not wet) cloths on plates
Dry paper towel wipe while still warm
Steam method for baked-on batter
Soft toothbrush and pastry brush
Baking soda paste with soft toothbrush
White vinegar on the stainless exterior
Dry completely before closing or storing
❌ Never Do These
Submerge, soak, or run under water
Use aerosol cooking spray on nonstick plates
Use scouring pads anywhere on the machine
Use metal utensils on nonstick grids
Use harsh detergents or bleach on the exterior
Use aerosol cleaning sprays on the housing
Put the base unit in the dishwasher
Store closed while plates are still damp
Why You Never Submerge This Appliance — Even a Little
The All-Clad manual says it twice: do not immerse the appliance or its cord in water or any other liquid. The PTFE nonstick plates sit directly above the heating element. There’s no waterproof barrier between them. Water that enters through the plate joints runs directly onto the element. The immediate result is potential electrical short. The longer-term result is internal corrosion that causes uneven heating — a problem you won’t notice until waffles start coming out half-raw.
Every cleaning method in this guide works with moisture controlled at the cloth or towel level. Nothing requires water near the plates. There’s no cleaning scenario that justifies the risk of running water over a waffle iron.
Aerosol Cooking Spray — The Slow Damage Nobody Notices Until It’s Bad
It doesn’t ruin the nonstick in one use. It takes weeks. That’s why people keep using it — they don’t connect the increasing stickiness with the spray they’ve been using since day one. By the time waffles are tearing and the plate surface looks brown and tacky, the polymerized propellant layer is thick enough that standard cleaning won’t remove it. Switch to a pastry brush with plain oil. Stop the accumulation. Then deal with what’s already there using the methods above.
Scouring Pads — Even the “Soft” Ones
PTFE nonstick scratches at lower force thresholds than most people expect. Even the blue non-scratch Scotch-Brite pad — perfectly fine on stainless steel cookware — is too aggressive for nonstick waffle plates used repeatedly. Soft toothbrush bristles are the right abrasion level. Anything harder accumulates damage that shows up as increased sticking after a few weeks.
Tools That Actually Work for Cleaning All-Clad Waffle Irons
Tool / Product
Use Case
Why It Works
Watch Out For
Quality 2-ply paper towels
Post-use dry wipe; absorbing pooled grease
Fold to a point and reach grid channels; absorbs fat efficiently while warm
Cheap single-ply shreds in the grooves and leaves fibers behind
Pastry brush
Brushing crumbs from grid channels; applying oil before first use
Soft bristles reach all four corners of waffle grid squares without any scratching
Don’t use for baking soda paste — bristles trap powder; use a toothbrush for that
Soft toothbrush (dedicated)
Grid channels, hinge area, baking soda paste application
Small head + soft bristles reach where cloths and paper towels can’t; safe on PTFE
Medium or hard bristle toothbrush scratches nonstick — soft bristle only
Q-tips / cotton swabs
Tight corners near hinge, lock catches, plate-housing joint
Reach spots physically inaccessible to any brush or cloth
Goes through them quickly on a real deep clean — have ten or more ready
Microfiber cloth
Stainless exterior; final wipe of plate surface; drying
Lint-free; doesn’t scratch stainless; effective on mineral deposits
Wash the cloth regularly — a greasy microfiber smears instead of cleans
pH 8–9 mild alkaline breaks adhesion chemically; abrasive mild enough for PTFE when brush-applied
Wipe off completely — residue baked onto nonstick on next cook causes sticking
White vinegar
Stainless exterior mineral deposits and water spots only
Acetic acid dissolves calcium carbonate cleanly; safe on polished stainless
Don’t use on nonstick plates — acidity affects PTFE coating with repeated use
Hydrogen peroxide
Mixed with baking soda for severe cooking spray buildup
Oxidizing action breaks down polymerized propellant residue more aggressively than water-based paste
Rinse off completely; residue on nonstick affects cooking and taste
Plain neutral oil (pastry brush applied)
Before first-ever use only; softening cooking spray residue
Conditions nonstick; no polymerizing propellants like aerosol sprays contain
One light application before first use — not before every use
Toothpick / wooden skewer
Hinge crease, lock catch crevices, batter in housing gaps
Reaches narrow gaps no brush or cloth fits into
Housing exterior only — never on the nonstick plate surface
🛒 The Actual Cleaning Kit — Total Cost Under $15
Two old toothbrushes dedicated to appliance cleaning. A pastry brush. A pack of quality paper towels. Baking soda from the pantry. White vinegar from the pantry. Q-tips from the bathroom cabinet. One bottle of hydrogen peroxide for severe situations. That’s everything. Nothing specialized, nothing expensive. The tools are already in most kitchens.
How to Prevent Buildup and Keep Your All-Clad Waffle Maker Cleaner Longer
Every deep cleaning session I’ve done on a neglected waffle iron was preventable. Not with better products — with habits. Three specific things done consistently make the machine almost self-maintaining.
Stop Using Aerosol Cooking Spray — Permanently
If you take one thing from this guide, make it this. Switch to a pastry brush with a few drops of neutral oil before the very first use. After that: nothing. A properly conditioned nonstick PTFE surface doesn’t need re-oiling between uses. The PTFE itself is the release mechanism — you’re not improving it with spray, you’re slowly destroying it.
If waffles start sticking after months of correct use, the fix is adjusting the batter recipe — more butter, more oil. Not spraying the plates.
Measure Batter Precisely — Every Time
Overfilling is the primary cause of batter entering the housing joints, overflowing into the hinge, and landing on the stainless exterior. Most waffle makers specify the batter volume in the manual. Most people eyeball it and consistently overfill by 20–30%. A batter cup or measuring cup matched to the specified capacity takes one session to calibrate — and the cleanup difference is significant. Less overflow means less mess in places that are difficult to clean without moisture risk.
Put Parchment or Foil Under the Machine Before Cooking
Consumer Reports suggests this. A sheet of foil or parchment under the waffle maker during cooking catches overflow before it hits the counter and before it runs down the side of the housing. When you’re done, discard the foil. Nothing to clean. Takes five seconds to set up and eliminates an entire category of exterior mess.
The Two-Minute Wipe Immediately After Every Session
Dry paper towel, folded to a point, dragged through every grid channel while the plates are still warm. Two minutes. This one habit prevents hardened batter, reduces the frequency of steam cleaning sessions, and keeps the plate channels clear so batter actually reaches the grid surface rather than sitting on accumulated residue from the last cook.
I’ve tested the difference directly. A waffle iron cleaned with the two-minute wipe after every use for a month needs a five-minute steam clean once. The same machine left without the post-use wipe for a month needs thirty minutes and a baking soda session. Same cooking frequency. Habit is the variable.
Leave the Lid Open After Cleaning — Then Store
Every cleaning method introduces some moisture near the plates. A few minutes of open-air ventilation lets that moisture evaporate before you close the lid and put the machine away. Specifically important in humid kitchens or for the Classic model where there’s a rubber gasket around the plate edges — trapped moisture there produces mold growth that’s genuinely difficult to clean from the recessed gasket channel.
💡 How Often Is Deep Cleaning Actually Necessary?
If you do the two-minute post-use wipe: a steam method deep clean once a month for weekly waffle makers. If you skip the post-use wipe regularly: steam clean every 2–3 uses. If you use cooking spray: deal with the buildup situation described above before worrying about frequency. The drip tray should come out and get rinsed every 3–4 uses or whenever visible batter accumulation appears.
FAQ: How to Clean an All-Clad Waffle Maker
Can you wash All-Clad waffle maker plates in the dishwasher?
Depends entirely on the model. The Gourmet model with removable plates — yes, top rack, standard cycle, All-Clad confirms dishwasher-safe. The Classic round and Belgian models with non-removable plates — no, and the base unit of the Gourmet is also not dishwasher-safe regardless. The heating element sits directly beneath the plates and water entry causes irreversible electrical damage. Even on the Gourmet, hand washing with mild soap and a soft sponge preserves the PTFE nonstick coating significantly longer than repeated dishwasher cycles.
How do you clean a waffle maker with plates that don’t come out?
The steam method is the most effective approach for non-removable plates. Unplug and cool slightly, then lay 2–3 damp (not dripping) paper towels on the bottom plate and close the lid for 5 minutes. The steam loosens baked-on batter without sending liquid water into the heating element. Follow with a soft toothbrush for the grid channels and a wrung-out damp cloth wipe. For stubborn residue, thick baking soda paste applied with a soft toothbrush, left 10–15 minutes, then wiped completely clean. Never run the plates under water — this machine cannot be submerged.
Why does my All-Clad waffle maker stick even though it has a nonstick surface?
Three common causes. First and most likely: cooking spray buildup — aerosol sprays (Pam and similar) polymerize at cooking temperatures into a sticky brown residue that makes nonstick plates tacky over weeks of use; stop using spray and clean the buildup with baking soda paste. Second: scratched nonstick surface from metal utensils or scouring pads — permanent damage that can’t be reversed on the Classic model. Third: underdone waffles pulled too early — a waffle that’s still releasing steam will stick; wait for the green ready light and don’t open the lid early.
Is it safe to use baking soda on All-Clad waffle maker nonstick plates?
Yes — with the right method. Baking soda paste (sodium bicarbonate mixed with water to thick paste consistency) applied with a soft toothbrush is safe on PTFE nonstick. The mild alkalinity (pH 8–9) breaks down baked-on batter adhesion and the abrasive action is gentle enough not to scratch the coating. Three rules: use a soft toothbrush only (no scouring pads, no stiff bristles), wipe away completely after cleaning (residue bakes onto the plate on next use and causes sticking), and make the paste thick enough that it doesn’t drip into the heating element housing beneath the plates.
How do you get burnt batter off a waffle iron without damaging the coating?
Start with the steam method — damp paper towels on the bottom plate, lid closed 5 minutes. This handles most burnt-on batter without any contact abrasion on the nonstick. If residue remains, apply thick baking soda paste with a soft toothbrush, leave 15 minutes, scrub gently with the same toothbrush, wipe off completely with a damp cloth. For severe months-old burnt-on buildup, mix baking soda with hydrogen peroxide instead of water, leave 1–2 hours. Never use metal tools to scrape burnt batter from the grid — one pass scratches PTFE permanently.
Can I use cooking spray on an All-Clad waffle maker?
No — and this is the most important single piece of care advice for these machines. All-Clad’s official care guide says to condition plates with a small amount of oil applied by pastry brush before first use only — not aerosol spray, and not before every use after that. Aerosol sprays contain propellants and emulsifiers that polymerize under cooking heat into a sticky residue that progressively degrades the nonstick surface over weeks. Consumer Reports documents this specifically. Use a pastry brush with a few drops of neutral oil for the very first use. After that, a properly maintained nonstick plate needs nothing.
How do you clean the outside of an All-Clad waffle iron?
Microfiber cloth, warm water, small amount of dish soap. Wipe along the grain of the polished stainless steel. Dry immediately — water left on stainless produces mineral spots. For water spot deposits and mineral haze from cooking steam, white vinegar on a microfiber cloth held against the spot for 30 seconds dissolves them. All-Clad’s manual is explicit: no scouring pads, no harsh detergents, no aerosol cleaning sprays on the exterior — these scratch the polished stainless finish permanently.
How often should I clean my All-Clad waffle maker?
The two-minute dry paper towel wipe should happen after every single use while the plates are still warm — this prevents 80% of buildup problems. The full steam method deep clean: once a month if you cook waffles weekly and do the post-use wipe consistently; every 2–3 uses if you skip the post-use wipe. The drip tray: every 3–4 uses or whenever you see visible batter accumulation. If you use the machine for one waffle session a month and wipe it down properly each time, a serious deep clean every 2–3 months is adequate.
What happens if water gets into an All-Clad waffle maker?
Water entering the heating element housing — from running the plates under the tap, soaking, or dripping wet cloths — causes two problems. Immediately: potential electrical short when next plugged in, which is both an appliance damage and a safety issue. Over time: internal corrosion of the heating element that produces uneven heat distribution — one area of the plate gets hotter than another, leading to waffles that brown unevenly and eventually burn on one side. If water entered the housing, dry the machine completely (lid open, 24 hours minimum) before plugging it back in. If it malfunctions after water exposure, All-Clad’s warranty covers manufacturing defects but not water damage from misuse.
⬇️ Bottom Line
Keep It Simple — These Four Habits Cover 90% of Everything
An All-Clad waffle maker is an expensive appliance with a genuinely fragile nonstick surface. The cleaning isn’t complicated, but two specific mistakes — aerosol cooking spray and anything abrasive on the plates — cause irreversible damage that no cleaning method fixes. Avoid those two things and the rest is maintenance.
Two-minute dry wipe while still warm after every use — folded paper towel through every grid channel; this one habit prevents most deep cleaning sessions
Steam method for everything stuck — damp paper towels, lid closed, 5 minutes; safest and most effective technique for non-removable plates
Never use aerosol cooking spray on the plates — pastry brush with plain oil before first use only; this single change protects the nonstick longer than any cleaning product
Never run water over the plates or submerge the machine — damp cloths, targeted paste, steam; that’s all the moisture this appliance ever needs
The waffle maker that spent six weeks accumulating cooking spray residue came back. Three cleaning sessions, baking soda paste, and switching away from aerosol spray. It’s been clean for two years since. Not because of any special product — because the habit changed.