✍️ 10+ years daily use of All-Clad D3 and D5 stainless steel🔄 Updated April 2026
All-Clad stainless steel pans — D3 tri-ply, D5, Copper Core — are built to last decades. Warping, pitting, chromium oxidation, polymerized oil, hard water deposits, thermal shock, Leidenfrost effect: this guide covers the full maintenance picture, before the first cook to long-term storage, so the pan performs as well in year ten as it did on day one.
I bought my first All-Clad D3 in 2014. Six months in, I had permanent pitting in the cooking surface from salting cold pasta water — twice. The white dots are still there, eleven years later. The pan cooks fine. But knowing what I know now, the pitting was completely avoidable and cost me nothing to prevent except information I didn’t have.
The second pan in that original set looks nearly new today. Same cooking frequency. Different habits — the ones this guide covers. That gap, between a pan that ages gracefully and one that accumulates damage, comes entirely from specific choices made before, during, and after each cook. Not products. Choices.
⚡ Quick Answer — All-Clad Pan Maintenance Core Rules
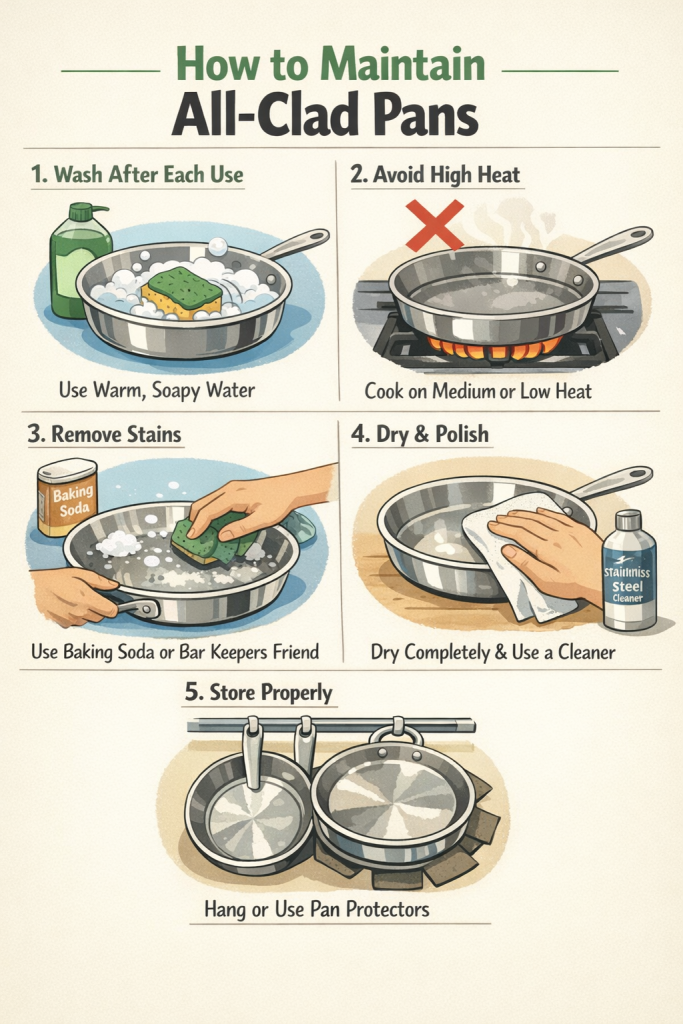
How to Maintain All-Clad Stainless Steel Pans: The Essentials
Before cooking: preheat on medium 2–3 min; water droplet test (Leidenfrost); add oil when drops bead and glide
During cooking: medium to medium-high heat only; high heat for boiling water solely; never leave empty pan on hot burner
Salt rule: add salt only after liquid boils or food starts cooking — cold-pan salt contact causes permanent pitting
After cooking: cool completely before washing; deglaze while warm; never cold-water shock a hot pan
Daily cleaning: warm soapy water, soft sponge, dry immediately every time
Monthly: Bar Keepers Friend powder along the grain — restores shine, removes accumulated staining
Storage: pan protectors between stacked pans; or hang; or vertical rack — stacking without protection scratches the cooking surface
Why All-Clad’s Construction Makes Maintenance Rules Matter More
A cheap thin stainless pan warps under thermal shock and stays warped — but it was already cooking unevenly before that. With All-Clad tri-ply or D5, the multiple bonded metal layers that make it perform so well are also what makes specific maintenance mistakes more consequential. Delamination from repeated thermal stress doesn’t announce itself dramatically. It just makes the pan gradually worse — less flat, more uneven heat, eventually behaving like something that cost a fraction of the price.
The 18/10 stainless cooking surface — 18% chromium, 10% nickel — forms an invisible chromium oxide layer that provides corrosion resistance. That layer is the reason stainless steel is stainless. Chlorine from bleach cleaners, chloride ions from undissolved salt on cold metal, sustained overheating — all of these compromise that layer at specific points. The result is pitting, rust-colored spots, and staining that has nothing to do with rust and everything to do with localized chromium oxide damage.
📌 This Guide Covers
All-Clad stainless lines: D3 (tri-ply), D5 (5-ply), Copper Core, and the standard stainless collections. The 18/10 stainless cooking surface. For nonstick All-Clad (HA1, B1) the maintenance rules are different — particularly heat limits, utensils, and cleaning products. Nonstick care is not covered here.
Collection
Construction
Oven Safe
Induction
Maintenance Note
D3 (tri-ply)
Stainless / Aluminum / Stainless
600°F
✅ Yes
Standard stainless care; most common model
D5 (5-ply)
Steel / Al / SS / Al / Steel
600°F
✅ Yes
Most warp-resistant; same care rules as D3
Copper Core
SS / Al / Copper / Al / SS
600°F
❌ No
Copper exterior band tarnishes; occasional copper polish needed on exterior only
HA1 Hard Anodized
Hard anodized Al + PTFE nonstick
500°F
❌ No
Different rules entirely — no BKF, no high heat, no dishwasher
B1 Nonstick
Bonded Al + PTFE
400°F
❌ No
PTFE-specific care; this guide does not apply
Complete All-Clad Pan Maintenance Schedule — Daily, Monthly, Yearly
Most maintenance problems come from not having a clear rhythm. People deep-clean when the pan looks bad instead of doing the small regular things that prevent it from getting there. This schedule — built from All-Clad’s official care guide, Prudent Reviews, and The Kitchn — takes less total time than reactive cleaning does.
Frequency
Task
Time Required
What It Prevents
Every cook
Water droplet preheat test before adding oil
30 sec
Sticking, polymerized oil buildup
Every cook
Add salt only after liquid boils or food starts cooking
0 sec (habit only)
Permanent pitting
Every cook
Deglaze with warm water while pan is still warm
1 min
Hardened residue, difficult cleaning sessions
Every wash
Warm soapy water + soft sponge + dry immediately
3 min
Water spots, mineral buildup, dull finish
Every wash
Towel-dry — never air-dry
30 sec
Hard water mineral deposits accumulating into permanent film
Monthly
Bar Keepers Friend powder polish — interior and exterior
Check storage — pan protectors present, no direct contact
1 min
Accumulating scratches from stacked pan contact
As needed
White vinegar for rainbow stains or white water spots
5 min
Chromium oxidation discoloration, mineral haze
As needed
Baking soda boil for heavy carbon/polymerized oil buildup
15 min
Reduced cooking performance from thick residue layers
Yearly
Inspect handles and rivets for looseness
1 min
Safety — a loose riveted handle is a real hazard under load
Yearly
Check base flatness on a flat surface
1 min
Catching early warping before it becomes severe
Before You Cook: Preheating and Oil Technique That Prevents Sticking
Every sticking complaint I’ve ever heard about All-Clad stainless — and there are a lot of them — traces back to preheating. Either skipping it entirely, rushing it on too-high heat, or adding oil before the pan is actually ready. Fix this one thing and the pan performs the way it’s supposed to.
Stainless steel has microscopic surface pores that open as the metal heats. When you add oil to a pan at the right temperature, those open pores receive it and create a thin, even film across the cooking surface. Food lands on the oil layer, not the metal. That’s the mechanism behind non-stick performance on stainless — not a coating, physics.
How do you know when it’s right? Flick a few drops of water onto the preheating surface. Three possible outcomes. They evaporate on contact — pan is too cold, pores haven’t opened. They skitter and spit in multiple directions — too hot, steam is forming too fast. They bead up into small spheres and glide smoothly across the surface — that’s the Leidenfrost effect. Pan is ready. Add oil now.
This test takes five seconds. It’s more accurate than timing, more reliable than visual cues, and works on any stove type. All-Clad’s FAQ describes it. Prudent Reviews demonstrates it on video. It’s the single most useful preheating technique for stainless steel cookware.
Oil: Type, Amount, Timing
Add oil after the Leidenfrost test — not before. Oil added to a cold pan sits there heating for the entire preheat period, breaking down progressively. Oil added to a properly preheated pan spreads immediately, shimmers within 30 seconds, and you’re ready to cook. The residue from pre-adding oil is exactly what creates those dark rings around the interior of the pan.
All-Clad recommends 1–2 teaspoons for a standard skillet. Enough to coat the cooking surface in a thin even layer. Too much pools in the corners and burns at the perimeter while the center cooks normally — creating both polymerized buildup and uneven cooking simultaneously.
For high-heat cooking, use high smoke point oils. Avocado oil handles up to 520°F. Refined grapeseed and refined canola hold to around 400–420°F. Butter alone smokes at 350°F — fine for low-heat finishing, not for a sear. Extra virgin olive oil smokes around 375°F — lower than most people think, and commonly the source of the black residue people see after cooking with it at high heat.
Cold protein dropped directly from the fridge into a hot pan causes two problems: uneven cooking as the cold mass pulls heat from the pan center, and micro thermal shock at the cooking surface. Both affect food release and long-term pan surface condition. Thirty minutes out of the refrigerator before cooking is enough. All-Clad’s official FAQ specifically recommends this. It feels like a cooking tip — it’s also a maintenance tip.
Heat Control During Cooking: The All-Clad Rule Most People Ignore
All-Clad’s tri-ply and D5 construction distributes heat so efficiently that medium heat on most home burners equals what a restaurant high-BTU burner produces on a cheap thin pan. This is the whole point of the construction. It’s also why people consistently overcook with All-Clad — they bring their high-heat habits from inferior cookware and wonder why everything burns.
Low to medium for frying, braising, sautéing, and simmering. Medium-high for searing proteins. High heat for boiling liquids only. That’s from All-Clad’s FAQ and their Customer Service page — not corporate caution, accurate for how these pans actually perform. Sustained high heat on All-Clad stainless causes polymerized oil buildup (the dark ring), rainbow discoloration from chromium oxidation, and over repeated sessions, stress on the bonded layers.
A steak sear at medium-high on a properly preheated All-Clad produces better crust than the same steak at maximum heat on a thin pan. The even heat distribution means the entire cooking surface contacts the protein at the same temperature. No cold spots, no burnt patches. The pan does what it’s supposed to do without being pushed.
All-Clad is explicit on this: with the exception of preheating, empty pans should not be left on a hot burner. An unattended empty pan at high heat can reach temperatures that stress the bonded layers and permanently discolor the cooking surface. Preheating — which takes 2–3 minutes on medium — is the one intended exception. Anything longer than that while empty is damage territory.
✅ The Stick-Release Pattern Is Normal
Protein placed in a properly preheated All-Clad pan sticks initially. Every time. This is correct — the protein is bonding with the hot surface as the Maillard reaction begins. Leave it alone. When the crust forms and the proteins set, the food releases naturally with almost no resistance. If you try to move it and it tears, it’s not done. This isn’t a maintenance issue — it’s physics. Forcing food that’s still bonding to the surface is what leaves torn residue that’s genuinely difficult to clean.
The Salt Rule for All-Clad Pans: How to Prevent Permanent Pitting
The pitting in my D3 — those small white dots in the cooking surface — came from salting cold pasta water and walking away while it came to a boil. Did it once, saw no obvious problem. Did it twice. The pitting showed up after the second time. It’s been there eleven years. The pan cooks perfectly. But I see those dots every single time I cook with it, and they didn’t have to be there.
Pitting is the All-Clad maintenance failure that generates the most forum questions — usually framed as “did I ruin my pan?” — and the most misunderstanding. So let’s be clear about what it is, why it happens, and how different salt types affect the risk.
Stainless steel’s corrosion resistance comes from its chromium oxide layer. Sodium chloride — table salt — in contact with stainless steel initiates a localized electrochemical reaction. Chloride ions penetrate the chromium oxide layer at points of weakness, particularly where undissolved salt crystals sit directly on the cool metal surface. The reaction creates tiny craters — pitting — that the chromium oxide can’t repair from that point on.
The reaction is faster and more aggressive in cold or room-temperature water because the salt sits undissolved on the metal surface longer. In boiling water, salt dissolves almost instantly and disperses throughout the liquid, dramatically reducing the chloride concentration at any single point on the pan surface. That’s why the timing matters so much.
Add salt only after liquid is actively boiling. Or after food has started cooking and there’s a protective layer of oil between the salt and the metal. Stir immediately to disperse. Never drop salt into a cold pan. Never add salt to room-temperature water and leave it to come to a boil unattended.
Does Salt Type Matter?
Yes — but not in the way most people assume. The corrosive element is the chloride ion, which all sodium chloride contains regardless of whether it’s table salt, sea salt, or kosher salt. The difference is crystal size and dissolution speed. Table salt — fine granules — dissolves faster, so contact time with the metal is shorter. Coarse sea salt and kosher salt sit as larger undissolved crystals on the metal surface longer before dissolving. If you’re going to add salt before the boil (which you shouldn’t), fine salt is marginally safer. But the correct answer is wait for the boil regardless of salt type.
Salt in pasta water gets the most attention, but chloride-based corrosion happens in other cooking scenarios too. Salty marinades left sitting in the pan at room temperature. Brining liquid at cold temperatures. Highly seasoned braises where the pan sits off heat for extended periods. The pattern is the same: concentrated chloride ions in contact with cool stainless steel for extended time. The fix is the same: don’t leave it, and season after things start cooking.
⚠️ Pitting Is Permanent — There Is No Fix
Bar Keepers Friend doesn’t remove pitting. Vinegar doesn’t remove it. Professional polishing can smooth minor surface texture but cannot fill craters in the metal. All-Clad states explicitly that pitting doesn’t affect cooking performance — and that’s true. But it looks bad and it’s there forever. Prevention costs nothing except a habit: salt after the boil, every time, no exceptions.
Best and Worst Utensils for All-Clad Stainless Steel Pans
18/10 stainless is harder than cast iron seasoning — but it still scratches from metal utensil use, particularly at the edge angle and with repetition. Interior surface scratches on stainless are mostly cosmetic, not functional. But they collect residue faster, make thorough cleaning harder, and over years of daily cooking with metal tools accumulate into a noticeably rougher surface texture that you can feel when you run your finger across it.
✅ Safe — Use Freely
Silicone spatulas and spoons
Best all-around choice. Heat-resistant to 600°F+, flexible enough for fond-scraping, zero surface impact. The only downside: cheaper silicone spatulas degrade at sustained high heat over years.
Traditional, safe, effective for deglazing and stirring. Don’t use sharp-edged wooden scrapers on the cooking surface — the angle matters more than the material.
✅ Safe — Use Freely
Nylon / plastic tools
Heat-safe to around 400°F typically — check your specific tool’s rating. Fine for most cooking. Lower heat ceiling than silicone is the only limitation.
⚠️ Use With Care
Metal tongs
Fine for gripping food, problematic if you scrape the tong edge across the cooking surface. Use the tip, not the edge. Tongs used correctly on All-Clad don’t cause meaningful damage.
⚠️ Use With Care
Stainless steel whisks
Safe for liquid-based cooking — sauces, gravies, scrambled eggs. The wire contact area is small and the motion is lateral, not dragging. Avoid using a stiff whisk to scrape the bottom of a dry or barely-oiled pan.
❌ Avoid on Cooking Surface
Metal spatulas dragged across the surface
The flat edge dragged along the cooking surface creates linear scratches with every use. They accumulate invisibly for months then become obvious. A silicone spatula does the same job without the damage.
Exterior Care: Moving the Pan
Don’t slide or drag All-Clad across the cooktop surface. The bottom rim of the pan scratches both the pan’s exterior and a glass or ceramic cooktop surface simultaneously. Pick it up. Always. This sounds obvious but after years of daily cooking it becomes an unconscious habit — and the scratches on the exterior bottom of neglected pans show exactly where it was dragged repeatedly.
💡 Rivets and the Logo Area
The interior rivets and the embossed All-Clad logo on the exterior are the areas where grease and food residue collect and are hardest to clean. A dedicated toothbrush with Bar Keepers Friend paste reaches the recessed areas around rivets that a sponge can’t get into. Prudent Reviews recommends this specifically. Do it during your monthly BKF session and those areas stay clean without requiring special effort.
Maintaining All-Clad Pans on Different Stove Types: Gas, Electric, Induction, Ceramic
The stove type you cook on changes some maintenance specifics — how fast the pan heats, where heat concentrates, warping risk, and cleaning frequency. All-Clad’s stainless lines are designed for all heat sources except induction (which requires magnetic-compatible steel, which D3 and D5 have). Here’s what changes by stove type.
All-Clad on Gas Stoves
Gas burners concentrate heat at the flame rings, not evenly across the base. An All-Clad pan on a large high-BTU gas burner with the flame extending up the sides of the pan creates differential heating — center very hot, sides cooking differently. Match pan size to burner size. A 10-inch skillet on a 12-inch burner means the flame is heating the exterior sides of the pan, not just the base — this accelerates exterior discoloration and potentially stresses the sidewall bonding over time.
Gas also means more exterior carbon buildup from flame contact. The exterior bottom of gas-cooked All-Clad needs the monthly BKF treatment more urgently than induction-cooked pans. That black carbonized layer on the outside isn’t just cosmetic — thick buildup acts as an insulator, making the pan heat less evenly over time.
All-Clad on Electric Coil Stoves
Electric coils heat unevenly at the coil contact points. All-Clad’s fully-clad construction handles this better than disc-bottom pans — the heat distributes through the entire pan body rather than concentrating at contact points. Preheating slowly on medium is especially important on electric coils — the surface heats faster than the coil temperature stabilizes, so there’s a short period of uneven surface temperature while the coil catches up. Give it the full 2–3 minutes. Rushing preheating on electric coils is the most common source of sticking complaints on that stove type.
All-Clad on Induction Cooktops
All-Clad D3, D5, and the stainless collections are induction compatible — the outer stainless layer is magnetic. Induction heats extremely fast and precisely. The maintenance implication: preheating time is shorter — sometimes 60–90 seconds on medium is enough — and the Leidenfrost test becomes more important, not less, because the pan reaches temperature faster than it seems. Induction also heats the pan very evenly across the base with no flame to touch the sides, which means less exterior carbon buildup and cleaner exterior maintenance overall.
Warping risk on induction: lower than gas for most cooking because there’s no flame differential. But induction cooktops can deliver very high power on demand — some induction burners at maximum setting heat faster than any gas burner. If you use maximum setting, preheat is still on medium and thermal shock rules still apply with full strictness.
All-Clad on Glass and Ceramic Cooktops
Works well — All-Clad’s flat base sits cleanly on glass surfaces. Two maintenance-specific notes. First: never slide the pan across a glass cooktop — the rim scratches the glass surface permanently and scuffs the pan exterior. Lift and place every time. Second: the glass surface retains heat after the element turns off, which means your pan keeps receiving heat even after you’ve reduced the setting. Account for this in temperature management — on glass ceramic, turning the heat to medium means the pan will continue rising for another minute or two before stabilizing.
Stove Type
Preheat Time
Warping Risk
Exterior Buildup
Key Maintenance Note
Gas
2–3 min on medium
Moderate (flame differential)
High — monthly BKF exterior essential
Match pan to burner size; flame up sides discolors and stresses exterior
Electric coil
2–3 min on medium
Low–moderate
Low
Slow, even preheat especially important; coils lag behind surface temperature
Induction
60–90 sec on medium
Low (even base heating)
Very low — no flame contact
Fast heating means Leidenfrost test is more critical, not less
Glass ceramic
2 min on medium
Low–moderate
Low
Never slide across surface; glass retains heat after element adjusts
After Cooking: How to Cool and Deglaze All-Clad Pans Without Causing Damage
The five minutes after cooking ends are when most All-Clad maintenance damage happens — thermal shock from impatient rinsing, or residue left to harden because nobody felt like dealing with it. Both are fixable with the same solution: deglazing while warm.
Why Thermal Shock Warps All-Clad — and How to Avoid It
At cooking temperature, All-Clad’s bonded metal layers have expanded — stainless and aluminum at their respective thermal expansion rates, held together by the bonding process. Run cold water over a 375°F pan and those layers are forced to contract simultaneously at different speeds. The stress concentrates at the center of the base. Enough cycles and the base deforms — convex or concave — permanently.
A warped pan doesn’t sit flat on the cooktop. It creates hot spots at the contact points and doesn’t cook evenly. On induction, a pan that doesn’t make full base contact loses efficiency. All-Clad’s warranty excludes thermal shock damage and they can identify it. So can you — put the pan on a flat surface and push one edge; if it rocks, it’s warped.
The rule is simple: let the pan cool to where you can comfortably hold your palm near the base — roughly 100–120°F, which takes 10–15 minutes off the burner. Then wash with warm water. Not cold. Warm water on a warm pan is fine. Cold water on a hot pan is the problem, full stop.
Deglazing While Warm: The Most Useful Post-Cook Habit
Don’t wait for the pan to fully cool before starting cleanup. While it’s still warm — not hot, warm — add a small amount of warm water or stock and scrape the cooking surface with a wooden spatula or silicone scraper. The fond (browned bits) lifts immediately. The residue that would require soaking and scrubbing in twelve hours releases in twenty seconds now.
1
Remove food and set pan on a cool burner or trivet
Off the heat, not in cold water. Let it sit 5 minutes — still warm, not hot.
2
Add a splash of warm water — 2–3 tablespoons is enough
Or stock if you’re making a pan sauce. The liquid hits the warm surface and begins loosening the fond immediately through steam and thermal action.
3
Scrape with a wooden spatula or silicone scraper
The fond lifts cleanly. If you’re making a sauce, add more liquid and reduce. If you’re just cleaning, this step removes 90% of what would otherwise require effort later.
4
Pour out the liquid, proceed to standard washing once pan is cool enough
At this point the pan is mostly clean and full washing takes under two minutes. The same pan left overnight requires the full cleaning sequence below.
I deglaze automatically now, twenty seconds after plating. It’s become as instinctive as turning off the burner. The pans that get neglected post-cook are visibly dirtier after six months — same cooking, same cleaning products, completely different result from one habit.
Daily Cleaning Routine for All-Clad Stainless Steel Pans
For 80% of normal cooking — sautéed vegetables, pan sauces, scrambled eggs, fish — warm water, dish soap, and a soft sponge handles everything. The elaborate cleaning methods exist for when the daily routine gets skipped, or for monthly deep maintenance. Not for daily use.
1
Cool completely — 10–15 minutes off heat minimum
Warm to the touch is acceptable for washing with warm water. Still hot is not. This is where warping happens. Not worth the time saved by rushing.
2
Deglaze if you haven’t already — warm water + wooden spatula
If you did this while warm immediately after cooking, most of the residue is already gone. If the pan cooled completely with fond still on it, a brief soak in warm water for 10–15 minutes is the next best option.
3
Wash with warm soapy water and a soft sponge or nylon pad
Standard dish soap is fine on stainless steel — the “no soap on stainless” rule is for cast iron. A non-scratch Scotch-Brite pad or a soft sponge handles daily cooking residue without issue. For stubborn spots, a nylon scrubbing pad — not the green abrasive one — is acceptable on the stainless interior.
4
Rinse with warm water
Warm removes soap residue more completely than cold and produces fewer mineral spots on the surface as it drains.
5
Dry immediately with a clean cloth — this step is not optional
Air drying leaves tap water minerals behind as the water evaporates. One instance is a water spot. Six months of air drying on a daily-use pan is a chalky, dull mineral film that takes vinegar or BKF to remove. Thirty seconds with a dish towel or microfiber prevents all of it.
💡 The Dishwasher Question — Honest Answer
All-Clad labels their stainless lines dishwasher-safe. Occasional use is fine. Regular daily dishwasher use over a year degrades the finish noticeably compared to hand-washed pans used identically — high-alkaline detergents and thermal cycling work cumulatively on the polished surface. The Kitchn and Made In Cookware both document this. Hand wash when you can. Use the dishwasher when you’re exhausted or hosting twelve people. Not as the default.
Monthly Deep Maintenance: Bar Keepers Friend Method for All-Clad Pans
Bar Keepers Friend powder is the universally recommended deep maintenance product for All-Clad stainless — by All-Clad directly, The Kitchn, Prudent Reviews, and every serious cookware forum. Nothing else performs comparably. The oxalic acid dissolves iron oxide, rust tints, and oxidation discoloration. The feldspar abrasive polishes without the deep scratching that scouring pads cause. Monthly frequency on daily-use pans. Weekly if you cook protein-heavy meals that leave more residue.
1
Wet the pan surface lightly — paste consistency, not liquid
Just enough water to work the powder. Too much dilutes the product and reduces the oxalic acid concentration. You want something that stays on the surface, not runs off it.
2
Sprinkle BKF powder and spread into an even paste
Use the powder — not the liquid spray or the soft cleanser gel. The powder is more concentrated and gives you control over consistency. The Kitchn’s guide is specific about this: powder outperforms the liquid version on All-Clad.
3
Identify the grain direction and scrub parallel to it — always
Hold the pan under a light and look at the cooking surface. There’s a faint linear brush pattern — the “grain.” Scrub in the same direction as those lines. Cross-grain scrubbing creates permanent swirl marks that dull the surface. With the grain, you’re polishing. Against it, you’re scratching.
4
Maximum 60 seconds contact time — then rinse completely
Oxalic acid works within seconds. Extended contact can micro-etch softer stainless grades. Rinse thoroughly — BKF residue left on the cooking surface after heating affects food and can cause discoloration.
5
Do the exterior and around the rivets too
The exterior base — where the pan contacts the burner — accumulates as much polymerized oil as the interior. Same BKF treatment. For the area around rivets where grime packs in: an old toothbrush with BKF paste reaches what a sponge can’t. Prudent Reviews specifically calls this out. Takes thirty seconds extra and keeps those areas clean without a monthly excavation project.
6
Rinse completely, dry immediately, buff with microfiber
The surface should be noticeably brighter. Not just clean — polished. A second pass handles pans that have more accumulated buildup. Rinse completely between passes.
🔬 BKF Powder vs. Bon Ami vs. Baking Soda
Bar Keepers Friend powder — best for All-Clad stainless; oxalic acid removes iron oxide and rust discoloration; feldspar polishes; recommended by All-Clad directly. Bon Ami — gentler, no oxalic acid, better for light maintenance; less effective on heavy staining or rust tints. Baking soda paste — fine for stuck food and minor residue; no rust-dissolving chemistry; safe on nonstick (which BKF is not). For monthly All-Clad stainless maintenance, BKF powder is the correct tool.
How to Fix Common All-Clad Stains: Rainbow, White Spots, Black Rings, Rust Tints
Four types of discoloration appear on All-Clad stainless with regular use. All but one are fully fixable. None affect cooking performance. Knowing what caused each one tells you exactly which fix works — and which products waste your time.
That iridescent rainbow pattern after high-heat cooking. The chromium in 18/10 stainless forms a thicker protective oxide layer under intense heat — different thicknesses refract light at different wavelengths and you see spectrum colors. It looks alarming. The pan is not damaged. The chromium oxide layer is doing its job. Prudent Reviews demonstrates the fix on video.
Fix: undiluted white vinegar in the pan, 2–3 minutes, wipe with a soft cloth, rinse, dry. The acetic acid dissolves the uneven oxide layer uniformly. Prevention: don’t preheat empty pans on high for extended periods; medium heat is enough.
White Spots and Chalky Film (Hard Water Mineral Deposits)
Calcium and magnesium from tap water left to evaporate on the surface. Builds invisibly with repeated air drying into a dull, chalky film over months. Zero effect on cooking.
Fix: simmer a 1:1 white vinegar and water solution in the pan for 5 minutes, cool, wipe clean. For the exterior: vinegar on a microfiber cloth, hold for 30 seconds. Prevention: dry immediately after every wash — thirty seconds eliminates this problem entirely.
Black Rings and Dark Residue (Polymerized Oil)
Oil overheated past its smoke point cross-links into a polymer layer that bonds to the stainless surface. Soap doesn’t dissolve it. You need either an alkaline soak to soften it or an oxidizing agent to break it down.
Fix for light buildup: BKF paste, along the grain, full rinse. Fix for heavy buildup: boil 2 tablespoons of baking soda in water in the pan for 5–10 minutes — softens the polymerized layer — then follow with BKF paste scrub. Prevention: high smoke point oils; medium to medium-high heat; deglaze while warm.
Rust-Colored Spots (Iron Deposits, Not Actual Rust)
High iron content in tap water, or iron transfer from cast iron cookware stored nearby or stacked on top of stainless. The spots look alarming but aren’t rust on the stainless itself — they’re iron oxide deposits sitting on the surface.
Fix: Bar Keepers Friend paste — the oxalic acid dissolves iron oxide specifically and quickly. One pass usually handles it. Prevention: monthly BKF maintenance; dry immediately; don’t store cast iron in contact with stainless steel.
Stain Type
Cause
Functional Impact
Fix
Prevention
Rainbow / heat tint
Chromium oxide thickening from high heat
None
White vinegar 2–3 min, wipe
Medium heat; no prolonged empty-pan preheating
White spots / chalky film
Hard water minerals from air drying
None
Vinegar-water simmer or wipe
Dry immediately every time
Black rings / dark residue
Polymerized overheated oil
Affects cooking if thick layer
Baking soda boil then BKF scrub
Medium heat; high smoke point oils
White dots / pits
Chloride ion corrosion from cold-pan salt
None — cosmetic only
Not fixable — permanent
Salt only after boil
Rust-colored spots
Iron deposits from water or other cookware
None
Bar Keepers Friend paste
Monthly BKF; dry immediately
Dull grey finish
Accumulated micro-scratches and oxidation
None
Monthly BKF polish along grain
Monthly BKF + avoid cross-grain scrubbing
How to Prevent Warping in All-Clad Pans — and What to Do When It Happens
Warping is the one maintenance failure that actually affects cooking performance. Everything else in this guide is cosmetic. A warped pan has hot spots from uneven cooktop contact, potentially unstable on the burner, and on induction loses efficiency from incomplete base contact.
What Causes Warping
Thermal shock is the main cause — cold water on a hot pan forces the bonded metal layers to contract at different rates simultaneously. The stress concentrates at the base center and deforms it. A single thermal shock event rarely causes visible warping. Repeated cycles — cold water on hot pan every time you cook — accumulates damage over months until the base is measurably non-flat.
High heat concentrated on a gas burner smaller than the pan base is a secondary cause. The flame heats the center of the base more intensely than the perimeter. Over many high-heat sessions, differential expansion between the center (hotter) and rim (cooler) gradually distorts the base geometry. It’s subtle and slow — not something you notice happening, only something you notice has happened.
Prevention Rules
Never cold-water rinse a hot pan — let it cool to 100–120°F first (10–15 minutes off heat)
Never plunge a hot pan into a sink of cold water
Match pan diameter to burner diameter — oversized burners heat the sidewalls, not just the base
Preheat gradually on medium, not at maximum
Don’t move between high heat and immediate cold surface (pulling from oven directly to cold countertop marble or granite isn’t as bad as cold water, but still thermal stress)
If It Happens
Minor warping — slight rocking on a flat surface — can sometimes be partially corrected. Place the pan upside down on a completely flat rigid surface. Apply firm even pressure downward on the raised center of the base while the pan is slightly warm (not hot). This isn’t a guaranteed fix. It works on early, mild warping. Significant or repeated warping is permanent.
All-Clad’s warranty covers manufacturing defects but explicitly excludes damage from thermal shock and overheating. Warping from cold-water shocking isn’t covered. Warping that appears within the first few uses on a new pan — before any thermal shock events — is worth contacting All-Clad about. Their customer service can be reasonable on borderline cases: 1-800-ALL-CLAD.
How to Store All-Clad Cookware to Prevent Long-Term Damage
Storage is the maintenance category that gets least attention and causes the most gradual, invisible damage. The rim of one pan on the cooking surface of another, repeated hundreds of times as you pull pans from a cabinet, creates a network of fine scratches that collect residue and make cleaning harder over years. I didn’t use pan protectors for the first three years I owned All-Clad. The scratch pattern on those pans is visible and permanent.
Pan Protectors — Non-Negotiable for Stacked Storage
Felt or soft foam protectors between each stacked pan eliminate rim-to-surface contact entirely. All-Clad sells them. Amazon has generic versions for a few dollars. A folded kitchen towel works. The material matters less than the principle: any soft barrier between pan surfaces prevents the accumulated scratch damage from stacking.
Don’t use paper towels as pan protectors. Paper towel fibers are slightly abrasive and under the weight of stacked pans over months, they contribute to the micro-scratch problem they’re meant to prevent. Felt or foam. Folded cloth. Not paper.
Hanging Storage — Best Option When Space Allows
A pot rack keeps pans accessible without any stacking contact. The pans stay drier with airflow, which reduces the ambient humidity that can affect the exterior finish in very humid kitchens. Copper Core pans benefit most from hanging — the copper exterior band develops a patina that looks better maintained with airflow than stacked face-down. Hang from the handle’s hanging hole if present, or from a wide hook that supports the handle itself, not just grips a narrow section of it.
Vertical Rack Storage — Good Middle Ground
Vertical pan organizers — where pans stand upright rather than stacking — eliminate all stacking contact without needing ceiling height for a pot rack. They take cabinet footprint but each pan is accessible without lifting five others. The Kitchn and Prudent Reviews both recommend this for premium cookware. Works especially well for a set of graduated-size pans that would otherwise nest into each other.
Specific Storage Don’ts
Don’t store lids on pans in humid kitchens — trapped moisture under the lid creates water spots and surface dullness; store lids separately or in a lid organizer
Don’t stack cast iron on top of All-Clad stainless — cast iron releases iron oxide particles that transfer to the stainless surface and appear as rust-colored spots; store them separately or use a protector between them
Don’t store pans with food residue still on them — even trace amounts of residue left on the surface between uses cause staining and can attract moisture in storage
Don’t hang by a narrow hook through the handle hole under heavy load — the handle hole is a stress concentration point; a wide hook that supports the full handle is safer for long-term storage of heavy Dutch ovens or sauté pans
What NOT to Do: Maintenance Mistakes That Cause Real Damage to All-Clad Pans
✅ Do These
Preheat medium + water bead test before oil
Salt only after liquid boils
Cool completely before washing
Deglaze while warm after every cook
Dry immediately with a cloth every time
BKF powder monthly along the grain
Pan protectors between stacked pans
Match pan size to burner size
Silicone or wood utensils on cooking surface
❌ Never Do These
Cold water on a hot pan
Salt in cold or room-temperature liquid
Steel wool or abrasive pads
Bleach, chlorine cleaners, or oven cleaner
Leave empty pan on high heat unattended
Slide pan across the cooktop
Stack without protectors
Air-dry after washing
Scrub across the grain with BKF
Bleach and Chlorine — More Damaging Than Most People Know
Chlorine attacks the chromium oxide layer that makes stainless steel stainless. Sustained chlorine contact causes localized pitting and starts genuine corrosion in spots where the protective layer is compromised. This includes chlorine-heavy dishwasher pods — which is another reason frequent dishwasher use degrades the surface cumulatively. All-Clad’s care guide prohibits detergents containing bleach or peroxide explicitly. If you’re not sure whether a cleaning product contains chlorine, don’t use it on All-Clad.
Oven Cleaner — Never on All-Clad Stainless
Oven cleaner contains lye (sodium hydroxide) at pH 13+. At that alkalinity, it doesn’t just clean — it etches the stainless surface and can damage the bonded layer structure. All-Clad’s care guide prohibits it specifically. If you have buildup that seems to require oven cleaner, the baking soda boil method followed by multiple BKF passes handles it without surface damage. Takes longer. Doesn’t etch anything.
Steel Wool — No Scenario Where It’s Right on All-Clad Stainless
Steel wool removes stains. It also leaves permanent linear scratches across the grain that collect food residue and discolor faster than the surrounding surface. There’s no polishing method that removes those scratches at home. BKF with a non-scratch nylon pad removes every stain steel wool would remove, without the damage. The choice between them isn’t preference — it’s understanding that steel wool is categorically the wrong tool for this material.
How Long All-Clad Pans Last — Signs of Real Damage vs. Normal Aging
All-Clad’s stainless lines carry a limited lifetime warranty, and that’s not marketing language — it reflects the actual expected lifespan of properly maintained fully-clad tri-ply or D5 construction. Prudent Reviews found in their research that fully-clad stainless pans with proper care last multiple decades. Cheap impact-bonded pans with identical care might last five years before the base disc separates from the sidewall.
The warranty phrase is “limited lifetime” — it covers manufacturing defects, not damage from misuse. Thermal shock warping and chlorine damage are explicitly excluded. The maintenance habits in this guide are what the warranty assumes you’re following.
This Looks Bad But the Pan Is Fine
Rainbow discoloration — cosmetic, fixable with vinegar, no performance impact
White spots or chalky film — mineral deposits, fixable with vinegar, no performance impact
Pitting (small white dots) — permanent cosmetic issue; All-Clad explicitly states pitting doesn’t affect cooking performance
Surface scratches on interior — cosmetic on stainless, not a replacement indicator
Dull or grey finish — monthly BKF restores it; not structural damage
Dark exterior from gas cooking — carbon buildup from flame; BKF removes it; not damage
This Is Actual Damage — Consider Replacing
Warping that won’t correct — pan doesn’t sit flat, creates hot spots, potential tip hazard under load
Delamination at the rim — visible separation of bonded layers at the edge; creates a sharp edge and allows internal corrosion between layers
Loose or wobbly handle — All-Clad riveted handles almost never fail; if a rivet loosens, the pan is unsafe under load
Deep pitting exposing a different-colored metal — rare; if you can see non-stainless-colored metal in pit craters, the core layer is exposed and can leach into food
✅ About All-Clad’s Warranty
All-Clad’s warranty covers defects in materials and workmanship. Contact them at 1-800-ALL-CLAD (255-2523). Their customer service handles borderline cases reasonably — if your pan has a defect that appeared in normal use, it’s worth a call. Damage from thermal shock, overheating, improper cleaning products, and misuse is explicitly excluded from coverage.
FAQ: How to Maintain All-Clad Stainless Steel Pans
How do you maintain All-Clad stainless steel pans long-term?
Long-term All-Clad maintenance is a combination of cooking habits and cleaning habits applied consistently. Before cooking: preheat on medium, use the water bead test, add oil when drops glide. During cooking: medium to medium-high heat; high heat for boiling only. Salt after the boil, not before. After cooking: cool 10–15 minutes before washing; deglaze while still warm. Daily: warm soapy water, soft sponge, dry immediately. Monthly: Bar Keepers Friend powder along the grain for shine restoration. Storage: pan protectors between stacked pans. These habits together produce a pan that performs and looks like new after a decade of daily use.
Do you need to season All-Clad stainless steel pans?
No — and attempting to season them creates problems. Seasoning is the process of baking polymerized oil onto a porous surface like cast iron or carbon steel to create a non-stick polymer layer. All-Clad’s 18/10 stainless cooking surface is non-porous. Oil heated past its smoke point on stainless doesn’t build a useful seasoning layer — it polymerizes into a sticky, dark residue that’s difficult to remove and actually makes food stick more. The “seasoning” for stainless steel is the preheating and oil technique done fresh before each cook. Not a permanent coating you build up over time.
How do you keep All-Clad pans from sticking?
Three things in sequence: proper preheating, enough oil, and patience. Preheat on medium heat until water drops bead and glide across the surface (Leidenfrost effect — takes 2–3 minutes). Add 1–2 teaspoons of oil and wait until it shimmers. Add food — dry surface, room temperature if possible. Don’t move it until it releases naturally. Sticking on stainless steel happens because the pan wasn’t at temperature before oil was added, the oil wasn’t hot before food went in, or the food was forced off before the crust formed. All three failures have the same correction: slow down and let the preheating sequence complete.
Why does my All-Clad pan have white spots or pitting?
Two different problems with similar appearance. White spots that wipe away or respond to vinegar are hard water mineral deposits — calcium carbonate left by tap water evaporating on the surface. Fully fixable: simmer 1:1 white vinegar and water for 5 minutes. Prevented by drying immediately after washing. Small white dots that feel like slight texture changes and don’t clean away are pitting — localized corrosion caused by chloride ions (salt) in contact with cool stainless steel. Permanent. No cleaning product removes it. All-Clad states pitting doesn’t affect cooking performance. Prevented by adding salt only after liquid boils.
How do you restore shine to dull All-Clad pans?
Bar Keepers Friend powder. Wet the pan surface lightly, sprinkle BKF, work into a paste, scrub with a soft non-scratch pad parallel to the grain of the steel (never cross-grain — creates permanent swirl marks), rinse completely within 60 seconds of application, dry immediately with a microfiber cloth. One pass restores most shine; two passes handles pans with significant accumulated buildup. Do this monthly on daily-use pans. The Kitchn, Prudent Reviews, and All-Clad’s own care guide recommend BKF powder specifically — not the liquid or spray versions, which underperform.
How do you prevent All-Clad pans from warping?
Warping in All-Clad stainless is caused by thermal shock — rapid temperature change forcing bonded metal layers to contract at different rates. The prevention is straightforward: never run cold water over a hot pan, and never plunge a hot pan into cold water. Wait 10–15 minutes after cooking for the pan to cool to 100–120°F, then wash with warm water. Secondary cause: sustained maximum heat on a gas burner smaller than the pan base, which heats the center differentially from the perimeter. Match pan size to burner size and stay on medium to medium-high for normal cooking.
Can you put All-Clad stainless pans in the dishwasher?
All-Clad labels their stainless lines dishwasher-safe. Occasional use is fine. Regular daily dishwasher use over a year visibly degrades the finish compared to hand-washed pans used identically — high-alkaline detergents and chlorine compounds in modern dishwasher pods work cumulatively on the polished stainless surface. The Kitchn and Made In Cookware both document this. Hand wash for daily use. The dishwasher is an option for difficult weeks, not the default routine.
Is All-Clad stainless induction compatible?
Yes — D3, D5, and the standard stainless collections are all induction compatible. The outer stainless layer is magnetic. All-Clad’s Copper Core is also induction compatible despite the copper interior band. The nonstick lines (HA1, B1) are not induction compatible. On induction, the pan heats faster than on gas or electric — sometimes 60–90 seconds on medium is enough to reach the Leidenfrost test temperature — so the water bead test is more important, not less, because the pan reaches temperature before it visually appears to be hot.
Is Bar Keepers Friend safe for All-Clad stainless pans?
Yes — and it’s the product All-Clad recommends by name in their care guide. Bar Keepers Friend powder contains oxalic acid (dissolves iron oxide, rust discoloration, and oxidation) and fine feldspar particles (mild polishing abrasive). It’s recommended by All-Clad’s FAQ, The Kitchn, ChefTalk, and Prudent Reviews — universally considered the correct deep cleaning product for stainless steel cookware. Two rules: rinse off within 60 seconds (the oxalic acid works quickly and extended contact can affect softer stainless grades), and always scrub along the grain of the steel, never across it.
⬇️ Bottom Line
How to Maintain All-Clad Pans for a Lifetime — The Honest Summary
Two pans. Same brand. Same cooking frequency. Eleven years. One has permanent pitting and thermal shock history. The other looks nearly new. The difference isn’t products — it’s six specific habits applied consistently from the first month of ownership.
Preheat on medium, use the water bead test, add oil at Leidenfrost — this is how stainless steel performs non-stick
Salt after the boil, every time — pitting is permanent and costs nothing to prevent except this one habit
Cool completely before washing — thermal shock warping is the only maintenance failure that actually affects cooking performance
Deglaze while warm, dry immediately — these two habits together eliminate 80% of the cleaning effort that accumulates without them
Bar Keepers Friend monthly, along the grain — the pan looks new; accumulated staining disappears; shine is restored
Pan protectors in storage — thirty seconds per storage session prevents years of accumulated scratch damage
All-Clad’s warranty says lifetime. That’s realistic — if the habits are right. These pans are not delicate. They handle years of hard cooking. What they don’t handle is cold water on a hot surface, salt in cold liquid, or steel wool on the cooking surface. Avoid those three things, do the six habits above, and the pan genuinely earns the price tag over thirty years of use.


")

")


