✍️ Home cook and cookware specialist — 10+ years with All-Clad🔄 Updated April 2026
All-Clad pasta pot, perforated strainer insert, Simply Strain multipot, stainless steel stockpot, boiling water, salt timing, al dente pasta, steaming vegetables, shellfish, homemade stock, blanching — this is the complete guide to using every function of this pot correctly, from unboxing to long-term care.
The perforated insert on my All-Clad pasta pot sat unused in the cabinet for three months. I cooked pasta the old way — full pot to the sink, boiling water everywhere, colander in position. It worked. It was also completely unnecessary.
What changed my approach wasn’t pasta. It was green beans. I put them in the insert, lowered it into boiling water, pulled it at two minutes exactly — crisp, vivid green, no colander sprint, cooking stopped immediately. And the salted pasta water I’d normally pour down the drain was still sitting in the pot, hot and ready.
That’s the insert’s real value. Not just draining pasta without carrying a heavy pot — it’s precise timing, preserved cooking liquid, and a cleaner workflow for anything you pull out of hot liquid fast. Once that clicked, I found uses I’d never considered. This guide covers all of them, plus every mistake I made and watched other cooks make along the way.
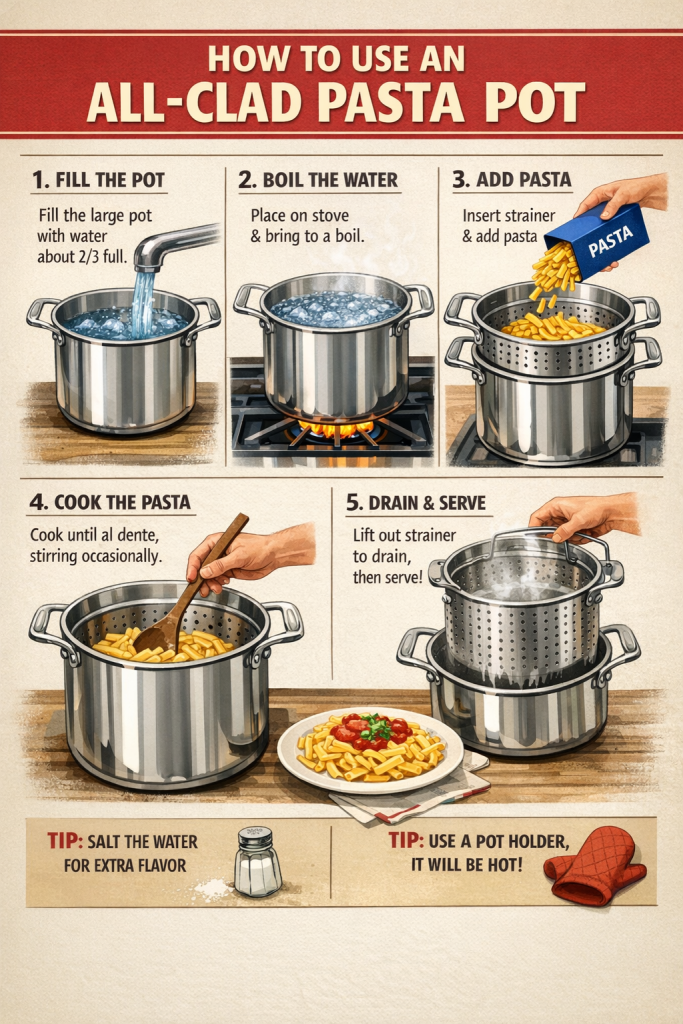
⚡ Quick Answer — How to Cook Pasta in an All-Clad Pasta Pot
Step-by-Step: Using the All-Clad Pasta Pot with Insert
Before first use: wash pot and insert — warm soapy water, rinse, dry; All-Clad’s manual requires this; removes manufacturing residue
Set insert inside the pot while dry — position it before filling; handles should clear the rim; never lower insert into already-boiling water
Fill with cold water — 4 to 6 quarts per pound of pasta — generous water dilutes starch, prevents clumping, reduces foam-over
Bring to a rolling boil on high heat — lid on — the only time All-Clad recommends high heat; remove lid once boiling to prevent foam spill
Salt the water only after it boils — not before — All-Clad warns that salt added to cold stainless causes irreversible pitting; 1–2 tbsp kosher salt per pound of pasta
Add pasta, stir immediately and every 60 seconds — first minute is the highest sticking risk; never add oil to water
Reserve pasta water before lifting the insert — scoop at least one cup; this starchy liquid is how you finish the sauce properly
Lift insert straight up, drain 15 seconds over the pot — water falls back into pot below; no colander, no sink trip, no mess
Before the First Use: What All-Clad Requires You to Do
Every All-Clad multipot and pasta pot ships with a simple but non-optional instruction in the manual: “Be sure to wash the pan before the first use and to clean thoroughly between uses.” This isn’t a formality. Manufacturing leaves residue — machine oils, metal particles from cutting, polishing compounds — on the interior surface of stainless steel pots. Cooking in an unwashed new pot means that residue goes into your water.
First Wash — Both the Pot and the Insert
Warm soapy water, soft sponge, thorough rinse. Do both the main pot and the perforated insert separately — the insert’s holes trap residue that a surface wipe misses. Rinse until the water runs completely clear. Dry immediately with a clean cloth. Don’t air dry — water spots form on stainless as water evaporates, and a freshly washed pot is the easiest place to prevent them.
New stainless steel often produces rainbow discoloration on the first high-heat cook. Blue, gold, purple tones inside the pot. This is chromium oxidation — the protective oxide layer thickening from heat — and it’s harmless. It’s not burning, not damage, not a defect. It happens to every stainless steel pot. White vinegar on a cloth wipes it off in seconds if it bothers you. It bothered me once. Now I don’t notice it.
✅ First-Use Checklist
Before cooking anything in a new All-Clad pasta pot:
Wash pot and insert separately in warm soapy water
Rinse until water runs completely clear
Dry immediately — don’t air dry
Check that insert handles sit above the pot rim when inserted
Locate the measurement markings on the pot interior — useful for water volume
The right size isn’t about how many people you feed — it’s about water volume. Pasta needs space. Tight, starchy water produces stuck, unevenly cooked noodles regardless of how good the pot is.
6 Qt Classic
All-Clad 6-quart pasta pot with 4-quart perforated insert
The original pasta-specific model. Single-ply polished stainless with a thick aluminum disc base. Handles 1 pound of pasta — but tight for long noodles because the short, round profile doesn’t submerge spaghetti immediately. Best for small households cooking one box at a time. Induction compatible. The compact shape is also genuinely useful as a stockpot for 1–2 portions of soup or stock.
8 Qt Simply Strain
8-quart Simply Strain multipot — the best all-around choice
Taller profile, more water volume, handles 1–2 pounds of pasta without cramping. Long pasta submerges naturally. The Simply Strain insert has straining holes on both the base and sides for faster drainage when you lift it. Works on all stovetops including induction. Oven safe to 600°F. This is the model I’ve used daily for three years and would buy again without hesitation.
12 Qt Simply Strain
Batch cooking, large families, seafood boils, canning
Right for households that regularly cook 2+ pounds of pasta, run big Sunday ragù sessions, do seafood boils, or make serious stock quantities. Too large for a weeknight dinner for two — more water means longer to boil and more energy used for no benefit. The 12-quart earns its place when you actually fill it.
Thanksgiving stocks. Backyard lobster boils. Canning twenty pounds of tomatoes. Not a daily cooking pot for most households — but when you need this size, nothing else works. Most home cooks never need the 16-quart.
💡 The Size Decision, Simply
Cook for 1–2 people regularly? The 6-quart is fine. Cook for a family or batch prep? The 8-quart is the right answer — it covers every use case without being excessive. The 12-quart is a second pot for specific large-scale tasks, not a replacement for the 8-quart.
How the All-Clad Perforated Strainer Insert Actually Works
The insert looks like a colander that happens to fit the pot. That’s essentially what it is — but the pot-shaped form factor, rather than bowl-shaped, changes what you can do with it in ways that aren’t obvious until you try them.
The Mechanics
The perforated insert sits inside the main pot, suspended just above the base. Water fills both the insert and the pot around it, so food in the insert is fully submerged in boiling water — same as cooking directly in the pot. When you’re done, grip both insert handles and lift straight up. Water drains through the perforations back into the pot below. Food stays in the insert. No colander, no sink trip, no carrying a heavy pot of boiling water across the kitchen.
That last point is the safety argument. A full stockpot of boiling water is genuinely dangerous to carry. Burns from boiling water are common kitchen injuries. The insert eliminates the need to move hot liquid — you move the food, and the liquid stays where it is.
Why the Pasta Water Matters
When you drain pasta into a colander at the sink, the cooking water goes down the drain. That water is seasoned, starchy, and hot — it’s the emulsifying agent that makes pasta sauce cling to noodles rather than pool at the bottom of the bowl. Italian cooking uses it at every stage: thinning sauce, finishing pasta in the pan, reviving leftovers. With the insert method, that water stays in the pot. It costs you nothing to preserve it. It changes the quality of what you cook with it significantly.
As pasta cooks, it releases amylose and amylopectin — starch molecules that dissolve into the cooking water. These starches act as natural emulsifiers: when you add pasta water to a fat-based sauce and toss over heat, the starch molecules link the fat and water phases together into a cohesive sauce that coats each noodle. Without it, oil-based sauces separate; creamy sauces go grainy. Two tablespoons of pasta water can rescue a sauce that’s about to break.
How to Cook Pasta in an All-Clad Pot — The Method That Actually Matters
The pasta itself isn’t complicated. What’s consistently off in home cooking is the sequence and the ratios — not wrong enough to ruin dinner most nights, but wrong enough that the pasta reliably comes out a notch below what it should be. Every step below has a reason.
Position the insert in the dry pot before any water goes in. Lowering an insert into an already-boiling pot is awkward, risks splashing, and puts your hands near steam. Set it in first. The insert handles should sit above the pot rim — if they don’t, the insert is in upside-down or the wrong size for the pot.
2
Use the interior measurement markings to fill correctly
All-Clad multipots have measurement markings inside. Use them. Four quarts minimum per pound of pasta — fill to the 4-qt line before the insert reduces usable volume. Most home cooks underfill by 30–40%, which is the root cause of most pasta sticking problems.
3
Lid on, high heat until a rolling boil — then remove lid
High heat is the one exception in All-Clad’s care guide. Lid traps steam and cuts boiling time significantly on a large pot. Remove the lid the moment a full rolling boil appears — foam builds fast once pasta goes in and a lidded pot foam-overs in seconds.
4
Salt only after the boil — generously
All-Clad’s official guide warns against salting cold water: it causes pitting on the stainless interior — small irreversible marks. Always wait for the boil. How much salt: 1 to 1.5 tablespoons of kosher salt per quart of water. Stir to dissolve. The water should taste clearly and pleasantly salty — like a mild seasoned broth. This is the only window to season pasta from the inside out.
5
Add pasta — stir immediately, stir every 60 seconds
The first sixty seconds are the highest-risk period for clumping, especially with long pasta. Stir the moment it goes in. Then stir every minute. Reduce to medium-high once boiling resumes — a vigorous but controlled boil, not a foam eruption. Don’t add oil to the water: it coats the pasta surface and prevents sauce from adhering later.
6
Scoop pasta water before lifting the insert
One cup minimum, two cups preferred. Use a ladle or measuring cup. Do this before lifting the insert — once the pasta drains, the water level drops and it’s harder to scoop. Set the pasta water aside. You’ll use at least half of it.
Package times run optimistic. Bite a piece one full minute before the package says it’s done. No white center, slight chew, completely cooked through — that’s al dente. Pull it there. It finishes cooking in the sauce for 60–90 seconds, and overcooked pasta can’t be fixed.
8
Lift straight up, hold 15 seconds to drain, move to sauce pan
Both hands on the insert handles, lift perpendicular to the pot surface — no tilting. Hold steady over the pot while water drains back through the perforations. Then move the insert directly to the sauce pan. Don’t rinse the pasta. Surface starch is what makes sauce cling.
Pasta goes directly into the sauce pan. Add 2–3 tablespoons of reserved pasta water. Toss over medium heat for 60–90 seconds. The starch emulsifies the sauce into a coating rather than a pool. This step separates good pasta from genuinely excellent pasta — and it costs nothing extra.
💡 Long Pasta and a Round Pot
The 6-quart All-Clad pasta pot’s compact shape means spaghetti doesn’t submerge immediately. Fan the noodles out around the insert as they go in — they’ll bend into the water within 30–60 seconds as they soften. The 8-quart’s taller profile handles long pasta more naturally without this workaround.
How Much Water and Salt to Use in an All-Clad Pasta Pot
Two variables determine pasta quality more than anything else: water volume and salt concentration. Both get consistently undertreated in home cooking, and both are easy to fix once you know the numbers.
Water Volume — Why More Is Better
The professional standard is 4–6 quarts of water per pound of dried pasta. More water dilutes the starch pasta releases as it cooks. Lower starch concentration means less surface tackiness, better texture, and pasta that doesn’t clump. In a 6-quart pot at capacity with the insert in, you’re at the tight end. In an 8-quart, you have real headroom.
Fresh pasta needs the same water volume even though it cooks in 2–4 minutes rather than 8–12. Fresh pasta releases starch faster and more aggressively than dried. If anything, fresh pasta benefits more from generous water — the starchy water turns cloudy faster and clumping risk is higher.
Salt — How Much Is Actually Correct
The Italian standard: 10 grams of salt per liter of water per 100 grams of pasta. In practical terms for American kitchens: 1 to 1.5 tablespoons of kosher salt per pound of pasta, adjusted per quart of water. Taste the water after adding salt — it should taste clearly salty, like a mild broth, not harsh. If you can barely taste the salt, add more. Under-salted pasta water produces flat, one-dimensional pasta that no amount of sauce seasoning fully corrects.
Fine table salt is roughly twice as intense by volume as kosher salt. If substituting, use half the listed amount. This matters because the difference between flat pasta and properly seasoned pasta is this step alone.
Pasta Amount
Water Volume
Kosher Salt
Minimum Pot Size
Approx. Time to Boil
½ lb / 225g
3 quarts
1 tbsp
6 qt
10–12 min on high
1 lb / 450g
4–5 quarts
1.5–2 tbsp
6–8 qt
12–15 min on high
1.5 lb / 680g
6–7 quarts
2.5–3 tbsp
8–10 qt
14–17 min on high
2 lb / 900g
8–10 quarts
3–4 tbsp
12 qt
16–20 min on high
⚠️ Official All-Clad Warning — Salt Timing
“To avoid small white dots or pits from forming in your pan, bring liquids to a boil or wait until food starts to cook before adding salt.” — All-Clad product guide, all multipot models. Salt dissolved in cold or warm water concentrates on the stainless steel interior surface before it fully disperses. Those concentration points cause microscopic pitting that’s irreversible cosmetically. It doesn’t affect performance, but it can’t be polished out. Always salt boiling water only.
How to Steam Vegetables with the All-Clad Pasta Pot Insert
Steaming vegetables in the insert is genuinely more precise than boiling them. When something’s done, you pull the insert and cooking stops immediately — no scramble to the sink with a full pot, no waiting for a colander to drain while the vegetables keep cooking from their own heat. The insert is a lifting basket, not just a strainer.
The method is also different from pasta. You don’t fill the pot — you add 2–3 inches of water and let steam do the work.
1
Add 2–3 inches of water to the base — not a full pot
A smaller water volume boils faster and uses less energy. The insert doesn’t need to be submerged for steaming — it needs to sit above the waterline so the food cooks in steam, not boiling water.
2
Bring water to a boil, then lower the insert with vegetables inside
Place vegetables in the insert first, then lower it into the pot once the water is already boiling. The insert rests above the waterline. Cover with the lid to trap steam inside.
3
Time from the moment the lid goes on
Steam cooks faster than most home cooks expect. Check at the low end of the range. Broccoli florets: 4–5 minutes. Green beans: 5–7 minutes. Asparagus (medium): 3–5 minutes. Carrots (sliced): 6–8 minutes. Corn on the cob: 10–12 minutes.
4
Lift the insert the moment they’re done — cooking stops immediately
No draining, no colander, no timing race. The insert comes up and the steam stops. For a cold salad or crudité — have an ice bath ready. Transfer from the insert directly into ice water to set the color and stop cooking completely.
Blanching vs. Steaming — Which Are You Actually Doing?
These are different techniques that the insert handles differently depending on water level. Blanching means submerging food in boiling water briefly — fill the pot fully, insert goes in, vegetables submerge. Used for setting color, pre-cooking for salads, preparing vegetables for freezing. Steaming means cooking food above boiling water in a steam environment — 2–3 inches of water, insert sits above the waterline. Gentler, preserves more water-soluble nutrients, better texture for delicate vegetables. The insert does both. The water level is what determines which you’re using.
✅ Why Steaming Beats Boiling for Most Vegetables
Boiling leaches water-soluble vitamins (B vitamins, vitamin C) directly into the cooking water, which then goes down the drain. Steam cooking keeps nutrients in the food. The texture is also better — vegetables steamed to crisp-tender hold their structure where boiled vegetables at the same doneness can turn mushy. For anything you care about eating rather than just cooking — steam.
How to Steam Shellfish and Seafood in the All-Clad Pasta Pot
Steaming shellfish is one of the better uses of this pot. The insert’s perforations are large enough for clams and mussels to rest in without falling through. The pot’s depth creates enough steam volume for a full batch. And steaming from a flavored liquid — white wine, garlic, herbs — means the steam itself carries aromatics into the shells.
The other advantage is the broth. When you steam mussels or clams, the liquid in the pot becomes a shellfish broth from the juices that drip through the perforations. That broth — strained, with crusty bread — is half the meal. The insert keeps it in the pot rather than draining it into a colander.
Steaming Clams and Mussels
1
Build your steaming liquid in the pot — 1 to 2 cups
White wine, water, or a mix. Add aromatics directly: a few smashed garlic cloves, a bay leaf, a pinch of red pepper flakes, a shallot sliced thin. Bring to a simmer. This liquid becomes the broth you serve alongside — taste it and season it accordingly before the shellfish go in.
2
Add scrubbed shellfish to the insert, lower into the simmering pot
A simmer — not a full rolling boil — is the right temperature for shellfish. Full boil toughens the meat. Lower the insert gently, cover with the lid, and start timing.
3
Cook until shells open: 5–8 minutes for mussels, 8–12 for clams
Shake the pot once midway through. Shells that don’t open after 12 minutes were dead before cooking — discard them without guilt. Open shell means done. Rubbery shellfish meat comes from overcooking, not undercooking.
4
Lift the insert — the broth stays in the pot below
The shellfish come out in the insert. The cooking broth, now full of shellfish flavor from the drippings, sits in the pot. Strain it through a fine mesh strainer into a serving bowl if you want it clear. Serve with bread. This is the part that makes the pasta pot format worthwhile for shellfish — the broth is already separated and accessible.
Whole Lobster and Large Crab
The 12 or 16-quart Simply Strain handles whole lobsters and Dungeness crabs. Same principle — a few inches of salted water or seaweed-infused liquid, insert in the pot, lid tight. A 1.5-pound live lobster takes 12–14 minutes. Dungeness crab (whole, pre-dispatched): 15–18 minutes. The insert lifts the whole thing out cleanly, which matters when you’re dealing with a full lobster in a pot of boiling water and don’t want to use tongs to fish it out.
Making Stock and Soup in an All-Clad Pasta Pot Without the Insert
Without the insert, the pot is a serious stockpot. I use the 8-quart for chicken stock more often than I use it for pasta — probably two or three times a month. The stainless steel construction handles long simmering without reacting with acidic ingredients, and the tall sides limit evaporation over a four-hour stock session.
Chicken Stock — The Method
1
Start cold — bones and water together, from cold
Cold water draws protein and collagen from the bones slowly, producing a clear stock. Hot water sets the proteins immediately and produces a cloudy result. Cold water in the pot, bones in, heat on medium. No preheating, no boiling water added. Cold start every time.
2
Bring slowly to a bare simmer — skim foam during the first 20–30 minutes
Gray-brown foam rises as proteins coagulate. Skim it with a ladle — this step separates murky stock from clear, refined stock. After initial skimming, the stock should run clear for the rest of the simmer. Add your vegetables, herbs, and aromatics after skimming.
3
Maintain the barest simmer for the full cooking time
Chicken stock: 3–4 hours. Beef or veal: 6–8 hours. The ideal is occasional bubbles breaking the surface — barely moving. A vigorous boil turns stock cloudy from emulsified fat and breaks down collagen in ways that produce a less refined texture. All-Clad’s even heat distribution makes holding a bare simmer easier than it is on thin-base pots.
4
Strain through a fine-mesh strainer — not the insert
The insert’s holes are too large for stock clarity. Use a separate fine-mesh strainer lined with cheesecloth if you want a very clear result. Cool the strained stock rapidly in an ice bath, refrigerate overnight. The fat rises and solidifies for easy removal before use.
🔬 Why Stainless Steel Is Right for Stock
Stainless steel is non-reactive. Wine, tomatoes, vinegar — nothing changes the flavor of the stock by contact with the pot surface. Aluminum can react with acidic ingredients over long cooking times, imparting a subtle metallic quality. All-Clad’s 18/10 stainless maintains complete neutrality over hours of simmering. The polished interior is also easy to clean after a rich collagen stock — no residue bakes into the surface the way it can on rough-finish pots.
Blanching and Batch Cooking with the All-Clad Multipot Insert
Blanching is how restaurants prep vegetables for service. Cook them 80% done in the morning, shock in ice water to stop cooking, refrigerate. At service, a quick dip in boiling water or a hot sauté finishes them to order in sixty seconds. At home, blanching is how you meal prep a week’s worth of vegetables in forty minutes — and the insert makes the timing precise enough to actually do it right.
Blanching Green Vegetables for Meal Prep
Bring a full pot to a rolling boil with well-salted water. Have a large bowl of ice water ready. Load the insert with trimmed vegetables and lower it in. Time from the moment it hits the water. Green beans: 2–3 minutes. Broccoli florets: 2 minutes. Asparagus: 90 seconds to 2 minutes. Snap peas: 60–90 seconds. When time is up — lift the insert, hold for five seconds to drain, tip directly into the ice bath. They stop cooking immediately. You get vivid green, crisp-tender vegetables that stay fresh for four to five days in the refrigerator.
The difference between properly blanched vegetables and improperly blanched ones is the ice bath timing. Without the insert, there’s a ten-second delay while you drain the colander — which is enough time to push past crisp-tender into soft. The insert removes that delay entirely.
Blanching Tomatoes for Peeling
Score an X in the bottom of each tomato. Load into the insert, lower into boiling water for 30–60 seconds until the skin at the X begins to pull back. Lift the insert, transfer tomatoes to ice water for thirty seconds. The skins slip off cleanly. Faster than peeling with a knife, cleaner result, and the scoring depth is the only variable that matters — shallow X means the skin tears instead of peeling.
Corn, Artichokes, and Large Vegetables
The 8 and 12-quart inserts hold ears of corn and whole artichokes without awkwardness. Corn: 4–6 minutes in a full rolling boil, submerged. Artichokes: 25–45 minutes depending on size — steam them above 2 inches of water rather than submerged, so the leaves cook in steam while the heart cooks through. The insert handles both formats without any equipment change. When they’re done, you lift the insert. No wrestling a full pot to the sink.
Every Other Way to Use an All-Clad Pasta Pot
Most people who own this pot use it for pasta and nothing else. That’s a waste of what it does. The combination of a large stainless stockpot with a lifting insert covers more cooking tasks than most people realize — without requiring any additional equipment.
Beyond pasta, steaming, and stock: the 8 and 12-quart models work well for large-batch soups and stews where the tall straight sides limit evaporation and let flavors concentrate without constant adjusting. Chili, minestrone, pozole — anything that simmers for an hour or more in a large volume benefits from the pot’s construction. The oven-safe rating to 600°F means you can start a braise or a one-pot pasta on the stovetop and finish it in the oven without a vessel transfer.
Canning is another legitimate use for the 12 and 16-quart models. Water-bath canning requires jars submerged in boiling water — the insert acts as a lifting rack that keeps jars off the pot’s base and lets you lower and raise them without tongs-and-disaster. The depth is right for standard pint and quart jars. The 8-quart is too small for most canning setups; the 12 and 16-quart are genuinely useful for this.
One use I didn’t expect: large-batch pasta sauce. Making ragù for twenty portions? The 8-quart handles it without crowding, the tall sides prevent splatter, and the heavy base distributes heat evenly enough that a three-hour simmer doesn’t scorch on the bottom even at the low heat it needs. Better than a wide, shallow sauté pan where the sauce volume is too thin and burns easily.
Use Case
Insert Used?
Best Model Size
Key Notes
Pasta (1 lb)
Yes — for draining
6–8 qt
4–6 qts water; salt after boil; reserve pasta water
Pasta (2 lb+)
Yes
12 qt
8–10 qts water minimum
Steaming vegetables
Yes — above waterline
8 qt
2–3 inches water; lid on; pull at precise time
Blanching for meal prep
Yes — submerged
8 qt
Full water; ice bath ready; timing is everything
Clams and mussels
Yes — above waterline
8 qt
Flavored liquid; simmer not boil; broth stays below
Whole lobster / crab
Yes
12–16 qt
Salted water or seaweed steam; precise timing
Chicken or vegetable stock
No
8–12 qt
Cold start; bare simmer; skim foam first 30 min
Large-batch soups and stews
No
8–12 qt
Tall sides limit evaporation; oven safe to 600°F
Canning (water-bath)
Yes — as jar rack
12–16 qt
Insert keeps jars off base; deep enough for standard jars
Tomato peeling
Yes
6–8 qt
Score X, 30–60 sec in boiling water, ice bath
Large-batch pasta sauce
No
8 qt
Heavy base prevents scorching on long simmers
What NOT to Do with an All-Clad Pasta Pot — Per the Official Guide
✅ Do These
Wash before first use — pot and insert
Salt water only after a full rolling boil
Use high heat for boiling only
Reserve pasta water before draining
Stir pasta immediately and every minute
Lift insert straight up — no tilting
Dry the pot immediately after washing
Hand wash to preserve the finish
❌ Never Do These
Salt cold water — causes permanent pitting
Leave empty pot on high heat
Add oil to pasta water — ruins sauce adhesion
Rinse cooked pasta — washes off surface starch
Plunge hot pot into cold water — warps the base
Use steel wool or harsh abrasives inside
Use chlorine bleach or peroxide-based cleaners
Leave standing water inside — causes mineral deposits
Empty Pot on High Heat
All-Clad’s care guide is specific: “With the exception of preheating, empty pans should not be left on a hot burner as it can cause damage.” Stainless steel without liquid to absorb heat can discolor — blue and brown from chromium oxidation — and in extreme cases can warp at the base. Don’t “preheat” a pasta pot on high to speed things up. Fill it with cold water and heat together. The heavy base on All-Clad multipots heats water faster than thin-base pots anyway — preheating dry gains nothing and risks damage.
Oil in the Pasta Water
A persistent myth. Oil is supposed to prevent pasta from sticking — it doesn’t work. Oil floats on water and doesn’t coat pasta while it’s boiling. What it does is coat the pasta surface after draining, making sauce slide off rather than adhere. The correct anti-sticking approach: enough water, immediate stirring, pasta into sauce the moment it drains. Not oil.
Cleaning and Long-Term Care of Your All-Clad Pasta Pot
The pasta pot is the easiest All-Clad piece to maintain because it mostly contacts water. No oil polymerization, no protein adhesion from searing — the main maintenance issues are mineral deposits from hard water and the occasional starch or scorched residue from a stock that simmered too hard.
After Every Use
Warm soapy water, soft sponge or nylon scrubbing pad, thorough rinse, dry immediately. The “dry immediately” part is what most people skip — and it’s the step that prevents the white mineral haze that builds up over months of air-drying a wet stainless pot. Thirty seconds of towel drying after every wash keeps the interior looking new indefinitely.
Removing White Mineral Deposits from Hard Water
The cloudy white film inside the pot after boiling tap water is calcium and magnesium. All-Clad’s official fix: boil a 1:1 solution of white vinegar and water in the pot for 5–10 minutes. Acetic acid dissolves the mineral deposits completely. Rinse thoroughly, dry. Once a month in hard water areas. Less often if you dry the pot consistently after washing.
Removing Burnt-On Starch or Scorched Residue
Baking soda method from All-Clad’s guide: sprinkle generously over the affected area, add water to cover, bring to a boil. Cool, scrape gently with a wooden spoon, wash normally. For tougher marks — Bar Keepers Friend paste (All-Clad explicitly recommends it), apply with a soft cloth, scrub along the grain of the steel, rinse completely. Never cross-grain scrubbing — it leaves swirl marks.
Dishwasher — Technically Yes, Practically No
All-Clad multipots are rated dishwasher-safe. Handwashing is recommended. The difference: repeated dishwasher cycles use high-alkaline detergent that dulls the polished stainless exterior over time. For a pot this expensive, three minutes of hand washing keeps it looking new for decades. The dishwasher is fine for the insert — the perforated insert cleans easily and the finish matters less.
Common Mistakes People Make with the All-Clad Pasta Pot Insert
Putting the Insert In After the Water Is Boiling
Lowering a large perforated insert into a pot of already-boiling water is genuinely awkward. The insert shifts, hot water splashes up through the perforations, and you’re fumbling with handles while steam hits your hands. There’s no reason to do it this way. Put the insert in the dry pot, then fill with water. The thirty seconds this saves on the back end isn’t worth the risk on the front end.
Underfilling the Water
The most impactful mistake, and the least obvious cause of the most common problem. Pasta that sticks together, clumps, or has an uneven texture almost always traces back to too little water — not to pot quality, pasta brand, or cooking technique. The insert takes up interior volume. Fill until the water level reads correctly on the interior measurement markings, not just until the pot looks full.
Tilting the Insert When Lifting
A full insert of pasta is heavy, awkward, and full of hot starchy water in the perforations. Tilting it as you lift sends water cascading unevenly — sometimes over the pot rim, sometimes on the stovetop, occasionally on you. Lift straight up. Both handles, perpendicular motion. Hold steady above the pot for 15 seconds while the bulk of the water drains back through. Then move it.
Cooking More Pasta Than the Insert Holds
The 6-quart pasta pot insert holds 4 quarts. A pound of pasta in 4 quarts of water is already at the minimum water volume. Adding 1.5 pounds of pasta to that same insert means the insert overflows before the pasta submerges. Either cook in batches or use the 8-quart. The water-to-pasta ratio matters as much as the total volume.
Not Checking Whether the Insert Is In the Pot Before Starting Stock
Sounds obvious. It isn’t. If someone else put the pot away with the insert inside — which is the natural way to store them — you start a stock, fill the pot, and only realize the insert is in there when you go to skim foam and hit the perforated bottom. No catastrophe, but pulling a hot insert out of simmering stock is annoying and unnecessary. Check the pot is empty before filling for any application other than pasta.
FAQ: How to Use an All-Clad Pasta Pot
When should you add salt to an All-Clad pasta pot?
Only after the water reaches a full rolling boil — never before. All-Clad’s official product guide warns that adding salt to cold or warm stainless steel causes pitting — small permanent marks on the pot’s interior surface. Salt added before boiling concentrates on the steel before fully dissolving. The damage is irreversible and cosmetically permanent, though it doesn’t affect cooking performance. Always wait for the boil, then salt generously: 1–1.5 tablespoons of kosher salt per pound of pasta. The water should taste clearly salty, like a mild broth.
How much water should you use in an All-Clad pasta pot?
The professional standard is 4–6 quarts per pound of dried pasta. For the 6-quart model with the insert in, you’re at the tight end of that range. For the 8-quart, you have comfortable headroom. More water is always better — it dilutes the starch pasta releases as it cooks, which reduces stickiness, prevents clumping, and improves texture. Underfilling is the single most common cause of pasta that sticks together, regardless of how good the pot is or how carefully you stir.
Can you use the All-Clad pasta pot for steaming vegetables and seafood?
Yes — and it’s one of the best applications of the insert. For steaming, add 2–3 inches of water to the base of the pot, bring to a boil, place the insert with food inside so it sits above the waterline, cover with the lid. The insert acts as a lifting basket — when the food is done, you pull it out and cooking stops immediately. No draining race, no colander. Works well for broccoli, asparagus, green beans, corn, mussels, clams, and whole lobster (in the larger 12-quart model). Not ideal for delicate fine-steam cooking like fish or dumplings, where you’d want a proper steamer basket with finer holes.
Why does pasta stick together in my All-Clad pot?
Almost always one of three things. First and most likely: not enough water — less than 4 quarts per pound concentrates starch and causes sticking regardless of technique. Second: not stirring immediately and every 60 seconds — the first minute is critical; starch hasn’t gelatinized yet and pasta bonds easily. Third: pasta sitting in the drained insert too long — pasta should go directly into sauce the moment it’s drained, not rest while you prepare other things. Never add oil to the cooking water — it doesn’t prevent sticking and prevents sauce from adhering later.
Should you put oil in pasta water when using an All-Clad pot?
No — and this is one of the most persistent myths in home cooking. Oil floats on water rather than distributing through it, so it doesn’t coat pasta while it’s boiling. What oil does is coat the pasta surface after draining — which makes sauce slide off the noodles rather than adhering. The correct way to prevent sticking: use enough water (4–6 quarts per pound), stir immediately when pasta goes in, stir every minute, and move drained pasta directly into sauce. No oil needed at any point.
What can you use an All-Clad pasta pot for besides pasta?
More than most people use it for. Without the insert: a high-quality stainless stockpot for chicken stock, vegetable stock, soups, stews, and large-batch sauces. With the insert: steaming vegetables and shellfish, blanching for meal prep, peeling tomatoes, cooking corn and artichokes. The 12 and 16-quart models work for water-bath canning with the insert as a jar-lifting rack. The pot is oven-safe to 600°F, so stovetop-to-oven one-pot meals are also within range. Most households use maybe 20% of what this pot is designed to do.
Is the All-Clad pasta pot induction compatible?
Yes — all stainless steel All-Clad multipots and the classic pasta pot work on induction, gas, electric, and ceramic stovetops. The wide heavy-duty stainless steel base provides good contact with induction heating elements. The exception is the All-Clad hard anodized aluminum pasta pot — aluminum doesn’t work on induction. If induction compatibility matters, confirm you’re buying a stainless steel model before purchasing.
How do you remove white spots from inside an All-Clad pasta pot?
White haze and spots inside the pot are calcium and magnesium deposits from hard tap water — purely cosmetic, no effect on cooking. All-Clad’s official fix: boil a 1:1 solution of white vinegar and water in the pot for 5–10 minutes. The acetic acid reacts with calcium carbonate and dissolves the deposits completely. Rinse thoroughly and dry immediately after. For exterior mineral spots on the polished stainless, Bar Keepers Friend paste scrubbed along the grain and rinsed off works cleanly. Do either monthly if you live in a hard water area.
Can you make stock in an All-Clad pasta pot?
Yes — without the insert, the pot is an excellent stockpot. The 18/10 stainless is non-reactive with acidic ingredients (wine, tomatoes, vinegar) that commonly appear in stock, and the tall sides limit evaporation over long simmering times. Key technique: start with cold water and bones together, bring slowly to a bare simmer, skim foam during the first 20–30 minutes, then maintain just below a boil for the full cooking time (3–4 hours for chicken, 6–8 for beef). Straining requires a separate fine-mesh strainer — the insert’s perforations are too large to produce a clear stock.
⬇️ Bottom Line
The All-Clad Pasta Pot: What Actually Matters
The insert is a timing tool, not just a convenience colander. Once you understand it that way — precise extraction from boiling liquid, cooking stopped at the exact right moment, no sink trip — you find uses you didn’t expect. Steaming vegetables to crisp-tender at two minutes exactly. Pulling shellfish the moment shells open. Blanching a week of meal prep in forty minutes.
Wash before first use — pot and insert both — All-Clad’s requirement; removes manufacturing residue
Water volume is everything for pasta — 4–6 quarts per pound; this is the root cause of most pasta problems
Salt only at the boil, never before — cold water plus salt causes irreversible pitting in stainless
Reserve pasta water before lifting the insert — one cup minimum; it’s the emulsifier that makes sauce adhere instead of pool
Don’t rinse pasta after draining — surface starch is what sauce clings to; rinsing destroys that
Dry the pot immediately after washing — the habit that prevents monthly mineral deposit cleaning sessions
The insert sat in the cabinet for three months because I thought it was a convenience feature for draining pasta. It’s more than that. It changed how I blanch, how I steam, how I think about precision in liquid cooking. The pot that comes with it is excellent too — but the insert is where the real utility lives once you understand what it’s actually for.

")
")


")
")

