✍️ Regular waffle maker user — 5+ years with All-Clad appliances
All-Clad waffle maker, PTFE nonstick plates, browning settings, preheat, batter volume, Belgian waffles, steam release, indicator lights, drip tray, removable plates — this guide covers every step of using an All-Clad waffle maker correctly, from unboxing to consistently excellent waffles, and every mistake in between.
My first waffle on the All-Clad came out pale, soft, and stuck to the lower plate in two places. Not dramatically — one corner tore, the rest released fine — but enough that I knew I’d missed something. The instruction booklet said to wipe the plates with oil before each use. I’d skipped that. I’d also poured batter before the green ready light came on because I was impatient and the thing looked hot enough.
Neither waffle was ruined. But neither was what this machine is capable of. By the third session I had the sequence down — preheat fully, oil the plates, right batter amount, don’t open the lid early — and waffles started coming out exactly right every time. Crispy exterior, open crumb inside, deep golden color. The machine wasn’t the variable. The process was.
This guide is that process, assembled from the official All-Clad manuals, real use over years, and every common mistake I’ve watched people make with this specific appliance.
⚡ Quick Answer — How to Use an All-Clad Waffle Maker
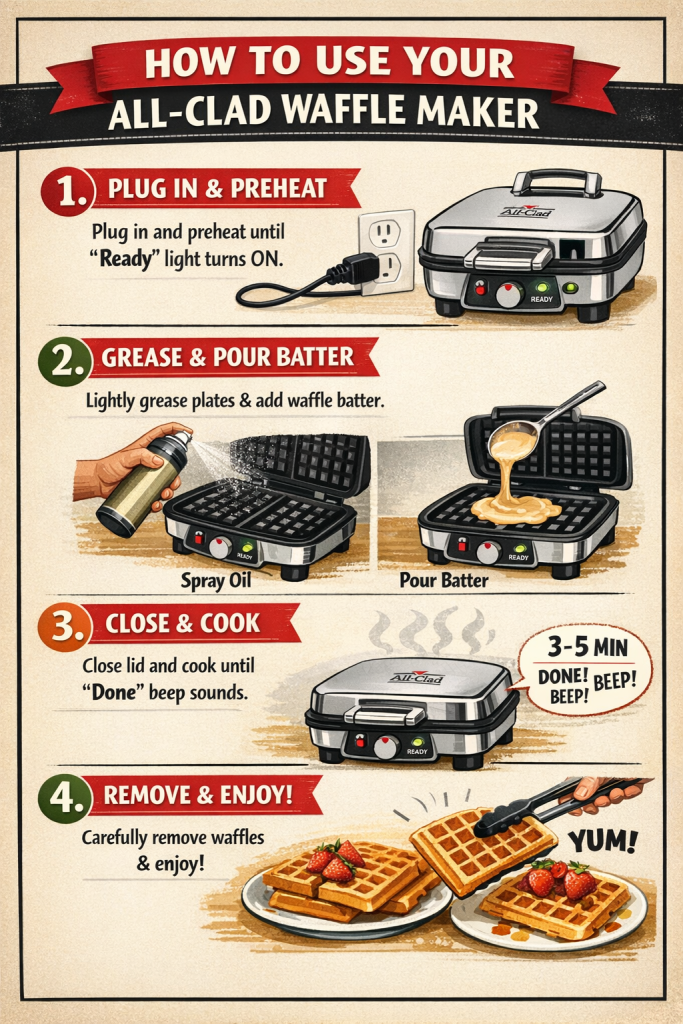
Step-by-Step: Using the All-Clad Waffle Maker Correctly
Before first use: wipe plates with damp cloth, then oil lightly — removes manufacturing residue; All-Clad manual requires this; expect slight smoke/odor on first cook — normal
Set thermostat to desired browning level, then plug in — All-Clad specifies: set the browness selector first, then plug in; preheat 5–7 minutes
Wait for the green ready light and the beep — non-negotiable; batter added before full preheat produces pale, undercooked waffles that stick
Oil the plates before every cook — wipe a small amount of neutral oil with a paper towel per the official guide; critical even on nonstick
Pour batter into the center — don’t exceed the separation line — too much causes overflow into the housing joints; batter expands significantly during cooking
Close lid, don’t lock the safety catches, don’t open until the second beep — opening early tears the waffle; the top plate drifts up as batter expands — don’t block this
Remove with a silicone or wooden tool only — metal utensils scratch PTFE permanently; one scratch is the beginning of chronic sticking
For the next waffle: wait for the ready light again — back-to-back batches without waiting for temperature recovery produces inconsistent results
Before the First Use: What All-Clad Requires You to Do
The official All-Clad Gourmet Waffle Maker manual is specific about first use: “Remove all packaging and stickers from your waffle maker and wipe the housing and plates with a damp cloth to remove any dust or residue remaining from manufacturing.” This isn’t a formality. Manufacturing leaves trace residue on PTFE nonstick surfaces — mold-release compounds, light machine oils, polishing agents. Cooking on unwashed new plates means that residue ends up in your food for the first few sessions.
First-Use Wipe-Down
Damp cloth on the plates and the housing. No soap on the nonstick — just a clean, lightly dampened cloth. Wipe the stainless steel exterior with a slightly soapy cloth if there’s visible residue from packaging. Dry everything before plugging in. Then do an initial preheat with no batter — let the machine cycle through once empty. This burns off any remaining manufacturing residue before food touches the surface.
Both the Classic Round and the Gourmet manuals state the same thing: “During the initial use of this appliance, some slight smoke and/or odor may be detected. This is normal and will stop after a few uses.” This is the PTFE nonstick coating curing under heat — it happens with every new nonstick appliance. Keep the kitchen ventilated. Don’t panic. It resolves by the second or third actual cooking session.
The First Cook Is Never the Best Cook
The first real waffle on any new All-Clad tends to stick more than subsequent ones and cook unevenly. The plates need a few actual cooking cycles to develop the thin oil layer from repeated use that makes the nonstick perform at its best. Make a throwaway batch with cheap mix — don’t sacrifice your overnight yeasted batter on a cold new machine. Cook a first batch, clean, then cook again. By session three, you’ll see what this machine actually does.
Remove all packaging, stickers, and accessories from inside and outside
Remove the overflow drip tray from its packaging — it’s often packed separately
Wipe plates with a clean damp cloth; wipe stainless exterior
Dry everything before the first preheat
Do one empty preheat cycle to burn off manufacturing residue
Oil plates lightly before first real cook
Expect slight smoke and smell — normal, resolves in 2–3 uses
All-Clad Waffle Maker Models: Classic Round, Belgian Square, and Gourmet
All-Clad makes several waffle maker models with different form factors, plate types, and browning controls. The core operation is identical across all of them — the differences are in plate design, cleaning approach, and number of browning settings.
The original All-Clad electric waffle iron. Round plates, 4 triangular sections. Non-removable PTFE nonstick plates. 7-position browning control. The compact round profile stores vertically — a genuine space saver. Makes thinner, crispier waffles than the Belgian model. The manual recommends wiping plates with oil before every use. Cleaning is done with the plates in place.
The Belgian model makes thicker waffles with deeper grid pockets — the format that holds more butter and syrup. Same non-removable plate design as the Classic. The Kitchn reviewed this model specifically and called it “a Rolls Royce” for even heat and consistent results. Overnight yeasted batter works best at setting 6; boxed mix at setting 4. The deeper plates require more batter per waffle than the Classic.
The newest All-Clad model. Four square waffles, removable PTFE nonstick plates that detach for separate cleaning or dishwasher. Six browning settings. All-Clad recommends setting 3 for golden brown. The removable plates mean cleaning is genuinely easier — and plates can eventually be replaced if the nonstick degrades. The Gourmet also has an overflow drip tray positioned to catch excess batter before it reaches the housing.
💡 Which Model Are You Using?
Check the bottom of the unit for the model number. If the plates lift out cleanly when unlatched — Gourmet model. If they’re flush with the housing and won’t budge — Classic or Belgian. The cooking process is the same for all three; the cleaning approach differs. This guide covers all models; notes on plate differences appear where relevant.
Understanding the All-Clad Waffle Maker Indicator Lights and Beeps
The light system on All-Clad waffle makers is how the machine communicates with you. Most first-time users ignore one of the two signals — which causes either undercooked waffles or waffles opened too early. Both the red and green lights have specific meanings that aren’t interchangeable.
The Red Power Light
Comes on the moment you plug in the machine. Stays on continuously while the machine is powered. It doesn’t indicate anything about temperature or readiness — only that the unit is receiving power. Some users wait for this light and immediately start pouring batter. That’s the mistake. The red light means nothing about cook readiness.
The green light comes on — accompanied by a beep — when the waffle maker has reached the selected cooking temperature after preheating. This is the signal that batter can go in. The manual is explicit: “Each time the waffle maker is used, wait until the green light comes on before pouring batter into the waffle maker plates.” Before the green light, the plates haven’t reached the right temperature for even cooking or proper browning.
The Green Light During Cooking
Once batter is in and the lid is closed, the green light cycles on and off regularly during cooking. This isn’t a problem — it’s the thermostat maintaining the selected temperature. The light going off doesn’t mean the waffle is done. It means the heating element briefly cycled. Ignore it.
The green light comes on again, accompanied by a second beep, when the cooking cycle is complete. This is the signal to open the lid and remove the waffle. Cooking time is typically 3–5 minutes depending on browning setting and batter type. Don’t open the lid before this second beep — the waffle is likely still setting and will tear.
🔔 The Two-Beep System, Simply
First beep + green light = machine is preheated, ready for batter. Cycling green light during cook = thermostat maintaining temperature, ignore it. Second beep + green light = waffle is done, open the lid.
Preheating is not optional and it’s not quick. Five to seven minutes is what both All-Clad manuals specify — not two minutes, not “until it feels hot.” An improperly preheated machine produces pale waffles with soft, sticky exteriors and waffles that tear when you try to remove them. The nonstick only releases cleanly when the surface is at proper cooking temperature.
1
Set the browness selector to your desired setting before plugging in
All-Clad’s manual specifies this order: set the thermostat first, then plug in. Plugging in with the selector at zero and then adjusting delays proper preheating. Select your setting — 3 for golden brown, 4–5 for darker and crisper — before the cord goes in the wall.
The machine starts heating. Keep the lid closed during preheat — the manual specifies preheating in the closed position. An open lid during preheat lets heat escape and extends the time to proper temperature.
3
Wait 5–7 minutes for the green light and first beep
Don’t rush this. A waffle iron that’s “hot enough to touch and make batter sizzle” is not the same as a properly preheated All-Clad at the correct cooking temperature. The indicator system removes the guesswork — wait for the signal, not your judgment of warmth.
Per the All-Clad guide: “Each time the waffle maker is used, wipe a small amount of cooking oil onto the waffle plates, then wipe with a paper towel.” Do this after the ready beep, before batter. A thin coat of neutral oil — canola, vegetable, grapeseed — applied with a folded paper towel or pastry brush, then wiped almost entirely off. The plates should look barely shiny, not visibly oiled.
⚠️ Don’t Add Batter Before the Green Light
Batter added to an underpreheated waffle iron does three things: it doesn’t brown correctly, it sticks more than it would at proper temperature, and it produces a waffle with a raw or gummy center that looks done on the outside because the exterior dried out slowly instead of crisping properly. The 5–7 minute wait is the most important step in the process. It’s also the one most often skipped.
All-Clad Waffle Maker Browning Settings Guide: Which Setting for Which Waffle
The 7-setting browning control (6-setting on the Gourmet model) is the feature The Kitchn review singled out as the best on the machine. Different batters behave differently under heat — and sugar content, fat content, and leavening type all affect how quickly a waffle browns. Dialing in the right setting for your specific batter makes a larger difference than most people expect.
Setting
Result
Best For
Notes
1–2
Light, pale, soft
Fresh waffles for toddlers; very delicate batters
Rarely the right setting for most adults; waffles may feel underdone
3
Golden, lightly crisp
All-Clad’s recommended default; standard waffle mix
Good starting point for first batch on any new batter recipe
4
Medium-dark, crisp exterior
Boxed waffle mix; buttermilk batter
The Kitchn recommends setting 4 for boxed mix specifically
5
Dark, very crisp
High-fat batters; batters with added sugar
Watch closely — high sugar batters brown fast and can burn
6
Deep brown, maximum crisp
Overnight yeasted batter; sourdough waffles
The Kitchn recommends setting 6 for overnight/yeast batter; these need more heat to crisp through the dense structure
7 (Classic/Belgian only)
Near-dark, aggressive browning
Very thick batters; waffles that need extended cooking
Use cautiously — easy to burn at this level; check at the beep and extend if needed
Why Yeasted Batter Needs Higher Heat
Overnight yeasted waffle batter — the kind you mix the night before and refrigerate — has a denser, more open structure from fermentation. It takes longer to cook through and needs more surface heat to crisp the exterior before the interior overcooks. Setting 6 is right for this batter because the higher heat creates the crispy shell faster. At setting 3 or 4, a yeasted waffle takes longer, loses steam, and often comes out pale and chewy instead of crispy and open-crumbed.
Sugar accelerates browning through the Maillard reaction and caramelization. A batter with extra sugar — dessert waffles, waffles with chocolate chips or fruit — will brown faster at the same temperature setting than a plain batter. Drop one setting below what you’d normally use. A chocolate waffle at setting 6 will burn before the interior is cooked through; at setting 5 it comes out right.
💡 Start at Setting 3, Adjust from There
For a new batter recipe you’ve never made before, start at setting 3 and evaluate the first waffle. Too pale and soft — go to 4 or 5. Too dark but the interior was right — stay at 3 or drop to 2. Write down the setting that works for each recipe you use regularly. After six months of weekly waffles, you won’t need to think about it.
Batter for the All-Clad Waffle Maker: How Much, What Kind, What Matters
Batter is where more mistakes happen than anywhere else in the waffle-making process. The amount per pour, the consistency, and how long batter sits before cooking all affect the result in ways that have nothing to do with the machine itself.
How Much Batter to Pour
All-Clad’s manuals on all models specify the same limit: “The amount of batter should not go past the separation line between the two cooking plates.” In practical terms for the Belgian and Gourmet 4-square models: approximately ¾ cup to 1 cup total per cooking cycle, depending on batter thickness. For the Classic Round: slightly less. Pour into the center of the plates — batter spreads outward as the lid closes and as heat expands it.
Overfilling is the most common batter mistake. Batter expands significantly during cooking — the top plate actually drifts upward to accommodate this expansion, which is normal and expected. Overfilled plates send excess batter into the hinge joints, the housing gaps, and the exterior surface. It’s messy to clean and it’s how batter reaches the electrical housing — which is a problem beyond mess.
Batter Consistency — What’s Too Thick, What’s Too Thin
Too thick: the batter won’t spread to fill the plate grid when you close the lid, leaving gaps. You get partial waffles with pale, uncooked areas in the corners. Too thin: it spreads immediately and unevenly, can leak through the plate edges, and produces a dense, flat waffle without the lift that fat and leavening create. The right consistency pours smoothly from a ladle, spreads to fill the plate within 30 seconds of the lid closing, and holds enough body to rise during cooking.
Baking Soda vs. Yeast Batter — One Critical Difference
Baking soda activates the moment it contacts liquid. If you mix a baking-soda-leavened waffle batter and let it sit 20 minutes while the machine preheats, the CO₂ that creates lift has already escaped. The waffle will be flat and dense. Mix baking soda batter immediately before cooking — not before the machine is ready. Yeasted batter is the opposite: it needs overnight fermentation to develop, and sitting makes it better. Know which type you’re working with before you start.
Batter Type
Mix Timing
Setting Recommendation
Key Variable
Boxed waffle mix
Mix right before cooking
Setting 4
Don’t overmix — lumps are fine
Standard from-scratch (baking powder)
Mix immediately before cooking
Setting 3–4
Rest 2–3 min after mixing; don’t stir again
Buttermilk batter
Mix immediately before cooking
Setting 4
Buttermilk makes batter thicker — may need thinning
Overnight yeasted
Mix night before, refrigerate
Setting 6
Bring to room temp 20 min before cooking
Sourdough discard
Mix 1–4 hours before
Setting 5–6
Dense — needs higher heat to cook through
High-sugar / dessert
Mix right before cooking
Setting 3–4
Lower setting than usual; sugar burns fast
Gluten-free
Mix right before cooking
Setting 4–5
Often thinner — may need slightly more batter
✅ The Overmixing Problem
Waffle batter should be mixed until just combined — lumps are acceptable and expected. Overmixed batter develops gluten networks that produce tough, chewy waffles instead of light, open-crumbed ones. Stir until the dry ingredients disappear. Stop. If you rest the batter 2–3 minutes after mixing, the gluten relaxes further and the waffle becomes even lighter. This is why most waffle recipes say “don’t overmix” — it’s not just fussiness, it’s the texture of the final product.
The Full Cooking Method — Step by Step
With the machine preheated and batter ready, the cooking sequence itself is straightforward. The variables that matter at this stage are lid discipline (don’t open early), batter placement (center, not edges), and utensil choice (silicone only).
1
Oil the plates after the ready beep, before batter
Dip a folded paper towel or pastry brush in neutral oil. Wipe the bottom plate across every section of the grid — in the peaks and valleys. Then the top plate if you can reach it with the lid open. Wipe off any excess. The plates should look barely shiny. Too much oil produces greasy waffles with soggy undersides.
2
Pour batter into the center with a ladle
Into the center of the plate, not the corners. Batter spreads when the lid closes — spreading from the center outward fills the plate more evenly than corner pouring. Use the separation line as your maximum fill indicator. The batter should sit slightly below that line before the lid goes down.
3
Close the lid — don’t lock the safety catches
The All-Clad manual is emphatic on this: “DO NOT LOCK THE SAFETY CATCHES ON THE SIDES OF THE WAFFLE MAKER WHEN COOKING.” The safety catches are for storage and transport only. During cooking, the top plate needs to drift upward freely as batter expands into the grid cavities. Locking prevents this movement and produces compressed, dense waffles — and potentially forces batter out the sides.
4
Don’t open the lid until the second beep
Steam coming from the sides is normal and expected — it’s the moisture in the batter evaporating, and it’s what creates the open crumb structure. Don’t interpret steam as a problem. Don’t open the lid to check. Opening the lid before the waffle has fully set tears the waffle along the plate grid — you get structural damage that can’t be fixed. Wait for the beep.
5
At the second beep: open the lid using the handle, assess
Always open using the handle — not the lid edge, not the top of the machine. If the waffle looks done to your preference: remove with a silicone spatula or wooden fork. If you want darker: close the lid for 30–60 more seconds and check again. The browning continues after the beep if you leave the lid closed.
6
Remove with silicone or wooden utensil — never metal
Metal forks, knives, or spatulas scratch the PTFE coating on contact. Each scratch creates a site where batter adheres more on the next cook. After enough scratches, the plate sticks consistently and no amount of oiling fixes it. Silicone spatulas and wooden forks reach into the grid wells without damaging the surface. The Gourmet has removable plates for easier removal; on the Classic and Belgian, a silicone spatula along the outer edge lifts the waffle cleanly.
💡 The Steam Signal
Steam pouring from the sides during cooking is a sign things are going right — not wrong. The steam is water vapor escaping from the batter as it cooks. When the steam noticeably slows or stops, the waffle is close to done. The machine’s beep usually aligns with this — but watching the steam is useful when you’re cooking a very thick batter that might need a bit more time than the standard cycle.
Cooking Multiple Batches in a Row: How to Keep Every Waffle Consistent
The second waffle is often better than the first. The third can be worse than the second if you skip the temperature recovery step. Consistency across a full batch for a family brunch is a different skill than cooking one excellent waffle — and it has a specific technique.
Wait for the Ready Light Between Batches
After removing a waffle, the plates have lost some heat to the batter and to the environment. The thermostat cycles the heating element back on to restore temperature. This takes 60–90 seconds typically. The green light and beep signal when the machine is back at the correct temperature. Adding batter before this recovery produces a waffle with a slower initial cook — which means more steam time, less crispness, and slightly different texture than the first one.
I used to skip this step when cooking for four people, rushing to keep waffles coming. The last two batches were always a bit paler. Waiting those 90 seconds is the difference between consistent results and declining results across a session.
Re-Oil Between Every Batch
Each waffle cook burns off some of the oil you applied before it. Oil the plates lightly again between every batch — same process as the initial oil: paper towel or pastry brush, thin coat, wiped almost entirely off. Takes fifteen seconds. Skipping this is why the fifth waffle of a session sticks when the first four didn’t.
Keeping Waffles Warm While You Cook the Rest
Waffles cool fast and lose their crispness within minutes at room temperature. The professional approach: preheat your oven to 200°F (93°C) before you start cooking. Place finished waffles directly on a wire rack on a baking sheet — not stacked, not on a plate — in the warm oven. The low heat keeps them warm and the wire rack allows air circulation so the underside stays crisp. Never wrap them in foil — they steam inside and go soft immediately.
🔬 Why Wire Rack Matters for Holding Waffles
A waffle placed directly on a plate traps its own steam against the underside. The underside softens within two minutes. A wire rack elevates the waffle, lets air circulate underneath, and the bottom stays crisp at 200°F for 20–30 minutes without meaningful quality loss. This is how diners and hotel breakfast stations hold waffles — same principle at home with a $12 wire rack.
How to Get Crisper Waffles from Your All-Clad Waffle Maker
The machine produces crispy waffles when everything is right. When waffles come out soft or limp, the cause is almost always one of five things — and none of them require a different machine.
Increase the Browning Setting
The most direct lever. Moving from setting 3 to setting 5 on the same batter produces a meaningfully crispier exterior. The caution: more heat also means faster surface browning, so the interior needs to keep pace. High-fat, properly leavened batters handle higher settings well. Low-fat batters or thin batters can get too dark before the interior sets.
Reduce the Liquid in Your Batter
More liquid = more steam during cooking = softer waffle. If your recipe is producing consistently soft results at even high settings, try reducing the milk or water by 2–3 tablespoons per batch. The batter will be slightly thicker and the resulting waffle will have less internal moisture to steam out — which means a crispier result.
Add Cornstarch to the Batter
Replacing 2 tablespoons of all-purpose flour with cornstarch in any waffle recipe produces a noticeably crispier texture. Cornstarch doesn’t develop gluten and absorbs less liquid than flour — the result is a thinner, crispier shell around a still-light interior. Not in the All-Clad manual, but tested and documented by serious waffle cooks including Serious Eats. Worth trying if you consistently want more crunch.
Separate and Beat the Egg Whites
Beating egg whites to stiff peaks and folding them into the batter at the end — separately from the yolks — creates a lighter, airier structure that crisps faster. The Kitchn notes this specifically for Belgian waffle batters. More surface area, more crispness, lighter interior. Takes five extra minutes and a second bowl.
Don’t Open the Lid Early
Opening the lid before the second beep releases steam that would otherwise continue cooking the exterior. The waffle collapses slightly, the grid pattern softens, and you’ve lost the crispness that was developing. The lid is the last cooking environment the waffle has — leave it closed.
What NOT to Do with an All-Clad Waffle Maker — From the Official Manual
✅ Always Do These
Set browness selector before plugging in
Wait for green light before pouring batter
Oil plates before every cook
Keep lid closed until the second beep
Use silicone or wooden utensils only
Wait for ready light between batches
Re-oil between every batch
Store vertically with safety catches locked
❌ Never Do These
Add batter before the ready light
Lock safety catches while cooking
Use metal utensils on the nonstick grids
Submerge the machine in water
Run the machine under the tap
Use aerosol cooking spray — damages nonstick
Use oven cleaners or bleach-based cleaners
Use steel wool or abrasive pads
Locking the Safety Catches While Cooking
Both the Classic and Belgian manuals make this explicit in capital letters: “DO NOT LOCK THE SAFETY CATCHES ON THE SIDES OF THE WAFFLE MAKER WHEN COOKING.” The safety catches are labeled and designed for storage — to hold the machine closed while you carry it or store it vertically. During cooking, the top plate needs to move freely upward as batter expands. Locking it prevents this natural expansion, compresses the waffle, and can force batter out the sides of the machine.
Aerosol Cooking Spray on the Nonstick Plates
Consumer Reports documents this across all nonstick appliances: aerosol spray propellants polymerize under heat, building a sticky residue layer on the nonstick surface. The All-Clad manual specifies wiping with cooking oil applied by hand — not spray. Six weeks of aerosol use creates a tacky film that makes the nonstick surface perform worse than it did new. Switch to a pastry brush or paper towel with neutral oil before every cook.
Opening the Lid Too Early
A waffle that hasn’t fully set will tear the moment the lid opens. The grid pattern embosses into the waffle during cooking — if you open before the structure has set, you get a torn, ragged, half-cooked waffle stuck to both plates simultaneously. The second beep is the signal. Wait for it. The extra two minutes of patience is non-negotiable.
Storing Waffles and Batch Cooking for the Week
The All-Clad makes four waffles per cycle. For a household of one or two people, that’s already more than one meal. For a family, it’s worth understanding how to preserve waffle quality across the week — and how to batch-cook efficiently on Sunday morning.
Refrigerating Waffles
Waffles keep in the refrigerator for 3 days in an airtight container or wrapped in plastic. Let them cool completely before sealing — sealing warm waffles traps steam that softens them. Reheat in a toaster or toaster oven at 350°F for 2–3 minutes. The toaster produces the closest result to fresh — the direct heat re-crisps the exterior. Microwaving makes them soft and rubbery.
Freezing Waffles
Waffles freeze well for up to 2 months. Cool completely, then freeze in a single layer on a baking sheet first — 30–60 minutes. Once frozen solid, transfer to a freezer bag with parchment paper between each waffle to prevent sticking. Reheat directly from frozen in the toaster — 2–3 cycles at medium-high setting. This is genuinely the best weekday breakfast strategy with an All-Clad: Sunday batch cooking, weekday toaster reheating.
Batch Cooking Efficiently
On a Sunday session, the sequence is: machine preheating while you mix batter, oven at 200°F while the first batch cooks, first batch on wire rack in oven while second batch cooks. A full morning batch of 12 waffles — three cooking cycles — takes about 25 minutes including prep. They stay good in the oven for 30 minutes without meaningful quality loss. Cool the extras, freeze before Sunday is over.
💡 Waffle Maker Beyond Waffles
The nonstick plates handle other foods that benefit from the waffle grid pattern. Hash browns pressed into the iron produce crispy potato squares in 6–8 minutes at setting 5. Quesadillas come out with a crispy grid pattern and melted cheese in 3–4 minutes at setting 4. Cinnamon rolls from a tube, pressed flat, cook in the waffle iron in about 3 minutes into a sticky, golden grid shape. The machine is more versatile than most people use it — the nonstick and the even heat work for anything that benefits from pressed-plate cooking.
Cleaning the All-Clad Waffle Maker After Every Use
The cleaning method for the All-Clad waffle maker is constrained by one critical fact: it’s an electrical appliance. Water that enters the housing near the heating element causes damage — and the plates are directly above those elements. Everything in the cleaning process is done with targeted moisture, not running water over the machine.
After Every Cook — While Still Warm
The best cleaning window is 5–10 minutes after the last waffle — unplugged, cooling but still warm. Warm batter residue is soft and wipes off with a dry paper towel dragged through the grid channels. The folded paper towel to a point reaches into the grid wells. Do both plates — top and bottom. This removes 80% of what accumulates before it hardens.
For Stuck or Hardened Batter
The steam method: lay 2–3 damp (not dripping) paper towels on the bottom plate and close the lid for 5 minutes while the machine is still slightly warm. The residual heat generates steam that loosens baked-on batter without any mechanical abrasion and without liquid running into the housing. After 5 minutes, wipe with a fresh damp cloth. Soft toothbrush for the grid channels. Q-tips for the corners near the hinge.
Cleaning the Stainless Steel Exterior
Warm water, microfiber cloth, small drop of dish soap. Wipe along the grain of the polished steel. Dry immediately. For water spots and mineral deposits — white vinegar on a microfiber cloth held against the spot for 30 seconds. All-Clad’s manual: no harsh detergents, no scouring pads, no aerosol cleaning sprays on the stainless exterior.
Gourmet Model: Removable Plates
Detach plates when fully cool. Hand wash with warm soapy water and a soft sponge, or dishwasher top rack. Dry completely before reattaching. The base housing — with plates removed — wipe with a damp cloth, avoiding the electrical contacts where plates connect. Dry immediately.
Drip Tray
Empty when cold per the All-Clad manual (oven mitts if it must be emptied hot). Rinse with warm soapy water, dry completely before reinserting. A wet drip tray reinserted against the housing is a mold risk in humid kitchens.
Common Mistakes People Make with the All-Clad Waffle Maker
Not Waiting for the Ready Light
The number one mistake, full stop. The red power light comes on immediately. The machine looks warm within two minutes. Batter goes in. The waffle cooks unevenly, browns poorly, and often sticks because the plates weren’t at cooking temperature when protein in the batter hit them. Seven minutes of patience between plugging in and first pour is the entire difference between this machine’s reputation and a mediocre waffle.
Overfilling the Batter
More batter feels like it should mean a better, fuller waffle. What it actually means is batter squeezed out into the hinge, down the sides of the machine, and onto the counter. The grid can only hold what the plates press — excess flows to wherever there’s space. The separation line between the plates is the limit. Stay below it. Batter that overflows also hardens in the housing joints and requires the most difficult cleaning sessions.
Locking the Safety Catches During Cooking
The safety catches look like they should be used during cooking — they’re on the sides, they lock the machine closed, and a locked lid feels more controlled. The opposite is true. The catches are for storage and transport. During cooking, locking them prevents the normal upward drift of the top plate as batter expands, compressing the waffle and producing a dense result. The manual says this in capitals. It’s still the mistake I see most often when someone watches me use mine.
Using the Same Setting for Every Batter
Setting 3 works for golden-brown waffles from standard mix. It produces pale, soft waffles from overnight yeasted batter. Setting 6 works beautifully for yeasted batter and burns boxed mix. The machine’s 7 settings exist because different batters need different heat levels. Calibrate per recipe rather than using the same default every time.
Not Oiling Between Batches
The initial oil coat burns off during the first waffle cook. By the third or fourth waffle of a session — with no inter-batch oiling — the plates are running dry. Waffles start sticking at the edges. The cooking quality drops. Fifteen seconds of re-oiling between every batch prevents this entirely. It’s easy to skip when you’re in a rhythm of cooking for a crowd, which is exactly when consistency matters most.
Opening the Lid to Check Progress
The waffle structure sets during cooking. Interrupting that process — even briefly — releases the steam that creates the open interior and can partially tear the waffle from the plate pattern. “Just a quick check” at the two-minute mark produces a waffle that releases badly because the structural set was interrupted. Trust the beep. If you want to know if it’s done, watch the steam from the sides — when it slows significantly, the waffle is close.
FAQ: How to Use an All-Clad Waffle Maker
How long do you preheat an All-Clad waffle maker?
5 to 7 minutes, per the official All-Clad manual for all models. The machine signals when preheating is complete with a green ready light and an audible beep — this is the actual indicator to use, not elapsed time. On cold mornings or in cold kitchens, it can take the full 7 minutes. On a warm countertop after previous use, it may be ready in 4–5 minutes. Set the browness selector to your desired level before plugging in, keep the lid closed during preheat, and wait for the beep.
What setting should I use on the All-Clad waffle maker?
All-Clad recommends setting 3 as the default for golden brown waffles. In practice: setting 3–4 for boxed waffle mix and standard from-scratch recipes, setting 5–6 for overnight yeasted or sourdough batter (which needs higher heat to crisp through its denser structure), and setting 3–4 for high-sugar or dessert batters (which brown faster than standard batter). Start at 3 for any new recipe and adjust from there — one waffle to calibrate is far better than burning a full batch.
Why are my waffles sticking to the All-Clad waffle maker?
Four possible causes, in order of likelihood. First: not enough oil on the plates — the official guide requires oiling before every cook, even on nonstick; skip this and sticking increases. Second: opening the lid before the second beep — the waffle structure hasn’t fully set yet; it tears rather than releasing cleanly. Third: adding batter before the ready light — plates at the wrong temperature mean protein bonds to the surface before the nonstick effect activates. Fourth: scratched nonstick from metal utensils — each scratch is a site where batter adheres permanently; switch to silicone or wooden tools.
How much batter do you put in an All-Clad waffle maker?
The batter should not go past the separation line between the two cooking plates — that’s All-Clad’s specification across all models. In volume terms: approximately ¾ cup for the Classic Round per section, and slightly more for the Belgian deep-pocket plates. Pour into the center of the plates, not the corners. Batter expands significantly during cooking — the top plate drifts upward to accommodate this expansion. Overfilling sends batter into the housing joints and onto the counter.
Can you use cooking spray on an All-Clad waffle maker?
No — All-Clad’s official guide specifies wiping oil onto the plates with a paper towel or cloth, not aerosol spray. Aerosol cooking sprays contain propellants and emulsifiers that polymerize under heat, building a sticky residue layer on the PTFE surface over weeks of use. Consumer Reports documents this for nonstick appliances generally. The result is a plate surface that performs progressively worse at releasing waffles. Use a neutral oil (canola, vegetable, grapeseed) applied with a paper towel, wiped to a barely-shiny finish, before every cook.
What does it mean when the green light flashes during cooking?
The green light cycling on and off during the cooking cycle is the thermostat maintaining the selected temperature — it’s normal and expected. The heating element briefly cycles off when the target temperature is reached, then back on when the temperature drops slightly. It’s not a sign that the waffle is done or that anything is wrong. The waffle is done when the green light comes on steadily, accompanied by the second audible beep. That’s the only cooking-complete signal.
Why do my All-Clad waffles come out soft instead of crispy?
Soft waffles from a properly preheated All-Clad have one of these causes: the browning setting is too low for the batter type (try increasing by 1–2 settings); the batter has too much liquid (reduce milk or water by 2–3 tablespoons); the lid was opened before the second beep, releasing the steam that crisps the exterior; or the waffles were placed on a flat plate after removal, trapping their own steam and softening the underside. Use a wire rack and a 200°F oven to hold waffles — the rack lets air circulate and they stay crisp for 20–30 minutes.
Can you make waffles ahead of time with an All-Clad waffle maker?
Yes — batch cooking and storing is one of the best uses of this machine. Waffles refrigerate for 3 days in an airtight container and freeze well for up to 2 months. For freezing: cool completely, freeze in a single layer first, then transfer to a freezer bag with parchment between each waffle. Reheat directly from frozen in a toaster or toaster oven at 350°F — 2–3 cycles. The toaster re-crisps the exterior. Microwaving produces soft, rubbery results. Sunday batch cooking, weekday toaster reheating is the most efficient way to use this appliance regularly.
Is the All-Clad waffle maker dishwasher safe?
The base unit — the machine itself — is not dishwasher safe and cannot be submerged in water on any model. The Classic Round and Belgian models have non-removable plates that must be cleaned with damp cloths only. The Gourmet model with removable plates is the exception: the plates detach and are rated dishwasher-safe on the top rack. The base housing of the Gourmet is still not dishwasher safe. Check your specific model — if the plates don’t lift out, nothing goes in the dishwasher or under running water.
⬇️ Bottom Line
How to Use an All-Clad Waffle Maker: What Actually Matters
This machine produces excellent waffles when the process is right. The process isn’t complicated — but it has four non-negotiable steps that most people skip at least one of, especially early on.
Before first use: wipe plates, do an empty preheat, expect smoke and smell — normal and temporary; don’t skip the prep
Wait for the green ready light before adding batter — every time — not “close enough” warm; the actual ready signal; this is the biggest variable in waffle quality
Oil the plates before every cook, re-oil between every batch — even on nonstick; even on the fifth waffle of the session; this is the difference between releasing and sticking
Don’t open the lid before the second beep — the structure sets during those 3–5 minutes; interrupt it and the waffle tears; trust the signal
Use silicone or wooden utensils only, never metal — one scratch on PTFE starts a sticking problem that gets worse not better
The pale, half-stuck waffle from my first session became completely predictable excellent waffles by session three. Not because I learned anything profound — because I read the manual, followed the sequence, and stopped being impatient about the preheat. That’s the whole secret to this machine.
")
")
")


")


